Showing posts with label DIY. Show all posts

Friday, October 2, 2020

DIY Travelers Notebook Book Journal with Wild Whisper Designs!

 Hello friends! I'm back today to show you a project I'm sharing on the Wild Whisper Designs Blog. I recently did a Facebook Live Video for Scrap Shotz, showing how to make a DIY travelers notebook with Wild Whisper products and the We R Memory Keepers book binding tool. I decided to create a book journal for my daughter who loves to read, and I know she'll love to fill this with all the books she's reading and keep little notes on each one! It was so easy, I may just have to make one customized for all my family and friends!


Here's a look at the first page I did, and you can see the rest on the Wild Whisper Designs Blog!

Here's a look at the video showing you lots of NEW Wild Whisper goodies and the exact dimensions to cut your paper to create the journal!


Thanks so much for stopping by! Be sure to check out the Wild Whisper Designs Blog for closeups & details of each page and a list of products I used from the Wild Whisper Designs Shop. Don't forget, you can save 10% off at the WW Store with the code DTKARLA, so happy shopping!! 


Linked to:
SSS Monday Challenge - Add A Photo!

Thursday, February 20, 2020

Flower Garden Applique with Video!

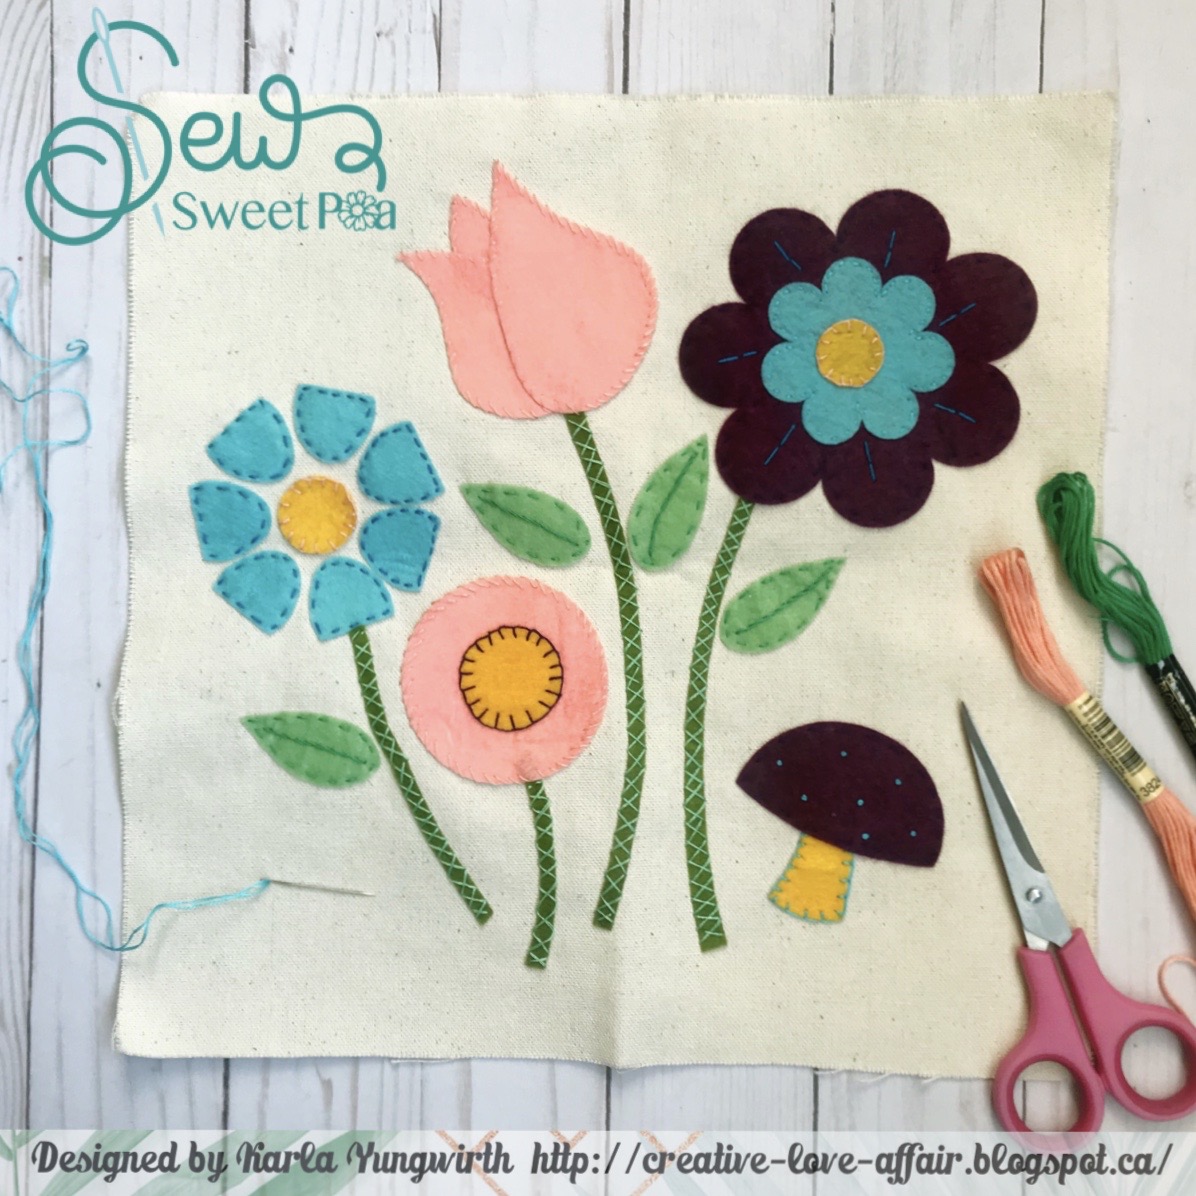
Hello friends! I'm very excited to share a new crafty company I came across - Sew Sweet Pea! Even though I primarily share papercrafting projects here, I do enjoy other crafts - crochet, home decor, vinyl designs with my Cricut, sewing & needlework - including applique! Sew Sweet Pea has beautiful applique patterns on their site, wonderful instruction references and what I really love is coordinating SVG patterns so I can easily cut the images and shapes with my Cricut Maker! Here's a look at the super cute pillow front I created with Cricut Felt shapes using the Flower Garden Applique Pattern - cut in no time precisely with the patterns uploaded into Design Space.


You can get the Flower Garden Applique Pattern FREE when you sign up for the Sew Sweet Pea Newsletter! The files come with fabulous PDF file resources explaining exactly how to applique and put together your beautiful Flower Garden!


Here's a look at the video where you can see how easy it is to upload the applique files to Cricut Design Space and start creating!


Thanks so much for stopping by! Be sure to head over to Sew Sweet Pea to check out all the other beautiful designs, and have a wonderful and relaxing weekend!! PS Watch for an upcoming post where I'm going to create an envelope pillow with this pretty piece 💮


Friday, December 13, 2019

Home For The Holidays Hop & Giveaway!

Hello! It's almost Christmas, and what could be better than a fun Holiday Hop with crafty, festive inspiration?!! Today, I'm participating in the Home For The Holidays Christmas Hop with a few crafty friends of mine. I can't wait to show you what I'm sharing - and be sure to scroll down because I've got a sweet GIVEAWAY!!


My girls and I have been doing lots of Christmas crafting lately, and these wood slice ornaments were something I've wanted to try! I started off by stamping adorable Kraftin Kimmie stamps from the Shake It Up and coordinating Shake It Up Polar Bears stamp sets on wood slices from Amazon.


The Krafty Kolours Inks available from Kraftin' Kimmie are lovely hybrid inks that stamp beautifully! After stamping I used coloured pencils to colour in the images - nothing fancy - even your kiddos can have fun doing this! I added some Liquid Pearls to the little pile of snowballs for added dimension here.


I added a bit of white gel pen to the little deer scarf (how cute is he?!!) and drew in some snowy hills with a black fine tipped pen.


I love all the cute images included in these sets - perfect to embellish the sweet animals! 


A bit of Stickles glitter glue adds just the right amount of glittery goodness to these ornaments.


On the back I stamped a cute sentiment and a few more snowflakes, again with the Krafty Kolours Inks. I used some bakers twine from my stash to tie through the hole and these ornaments are ready to gift or hang on our tree if I can't give them away 😉


Now, let's get to some BLOG CANDY!!

Let me tell you how awesome Kimmie is... I said I was offering an $10 gift certificate and she offered to bump it to $20!! So you have a chance to win a $20 gift certificate to the Kraftin' Kimmie Stamps shop 💙💰 where you can find super cute stamps, awesome inks, very cool stencils and more! She also has a Krafty Friends Facebook Group where you can find the nicest crafty peeps ever and tons of inspiration. To win, simply leave a comment here, and get extra entries for leaving a comment on the hop post on Instagram and/or Facebook

No photo description available.

Here's a list of each stop on the hop -

Whimsy Chic Papercrafts
It's Oddly Appealing
Scrappy Squirrel's Nest
Ink Stained Roni
Karla Yungwirth Designs - You Are HERE
Paper Mache Patch - NEXT
Nelly's Artistic Creations
Rosie Neustaedter
Kelly Parker
Zoe Bateman
Tina Jewels Creations
Natasha Blazaki Art Recipes & More

You can head over to the Paper Mache Patch next to see more fun holiday inspiration! Thanks so much for stopping by. I hope you are enjoying December and get to take some crafty time for yourself this weekend. Be sure to check back on Wednesday December 18th when I'll announce the winner of the Kraftin' Kimmie Stamps Gift Certificate!!


Thursday, June 20, 2019

Customizing Baseball Gifts Using The Cricut Maker with Video!

Hello! I am so excited to finally have a Cricut Maker!! I was lucky enough to find it on TSC, which is the Canadian Shopping Channel, and I used a 20% off coupon, making it super affordable with their interest-free payment plan! I previously had an Explore, which I loved, but I felt this was the right time to upgrade and take advantage of the new features the Maker has, including the ability to cut fabric easily with the rotary blade! With a birthday present needed for a little boy having a baseball themed party I thought this was the perfect time to break it open and get going. My daughter, Erica, who is 7 really enjoyed helping make this present for her little friend, and I enjoyed the crafting time with her!


Here's a look at the VIDEO where I'll show you step by step how easy it is to create two quick, easy, personalized gifts.


I was surprised and so pleased at how easily the Cricut Maker Rotary Blade cut through fabric! This was a white fleece material and I was a bit worried about how much residue it might leave on the fabric mat, but it came off completely clean. The Everyday Iron-On adhered perfectly to the fleece and we stitched up the pillow in no time.


Erica's friend was so excited to get his new shirt, and she thought it was an awesome gift to give! She was so proud of the fact that she helped to make it.


Thanks so much for stopping by! I'd love to know if you have an electronic cutter, and if so, which one? Have an awesome crafty week friends!


Monday, April 15, 2019

Farmhouse Recipe Holder and Cards!

Hello! I sure hope you have all had a great weekend. Today I'm sharing a pretty recipe card holder and mini folders to hold recipe cards. I find I often just look up recipes online now, but I do have my favourites that I love to use over and over, as well as a few that have been passed down. It's nice to have a home for those ones and a pretty place to keep the one I'm using safe and tidy. I started out with a chickenwire frame from the dollar store and stained the wood a light brown colour. Then I tucked a piece of green cardstock inside the backing, along with a mason jar cut out.


My family loved this Sweet Potato Scones recipe I found online and I wanted to make sure I kept it handy to make again! The Farmhouse kitchen sign was easy to make with some white corrugated paper covered with a silver stain so that it resembled corrugated metal. I cut out the words from a larger piece of cardstock and layered it all together.


I used the chicken wire paper to cover the front of the mini file folders and then added some fun labels. The paper itself was black and white so I chose a few colours that would coordinate with the frame and painted in the details.


I used some Little Birdie Crafts flowers and chipboard, along with some more images cut from different papers, to create a pretty cluster on the corner of the frame.


Here's few closeups of the details, along with the yummy scones!


Thanks so much for stopping by! I hope you have an awesome and very crafty week 💚

Linked to:
SSS Monday Challenge - Beautiful Blooms


Monday, December 17, 2018

Southern Ridge Trading Company- Altered Ornaments!

Hello! I’m getting super excited about Christmas coming, and even though I still have a ton of things to do, I’m enjoying the holiday season! These pretty ornaments that I made for the Southern Ridge Trading Company blog today were quick and easy, and a wonderful holiday project!


Here’s a look at the video where you can see how I put them all together!

Thanks so much for stopping by today! Be sure to pop over to the Southern Ridge Trading Company blog  where you can see how the ornaments look hanging on the tree and get a list of supplies. You can check out the Southern Ridge Trading Company Store where you’ll find lots of fun wood veneer, chipboard and even stencils to create even more fun projects!

Linked to:
SSS Wednesday Challenge - Christmas


Tuesday, December 11, 2018

Canvas Corp Brands - Christmas Bulb Challenge!

Hello! Hope you all had a great weekend. We took it easy, did some crafting - of course - and watched some Christmas Classics. My favourite thing to do is snuggle up on the couch in the living room with the Christmas Tree on. I have to remind myself to just sit and relax sometimes! Since we're in the festive spirit, I definitely wanted to share a tutorial I have over at the Canvas Corp Brands Blog where I'm creating three Christmas ornaments for this month's Christmas Bulb challenge. I'm using beautiful pre-printed canvas in the Canvas Corp Jolly Christmas Mix & Match Pad from the Canvas Corp Brands Shop. These are quick and easy to stitch up for your own tree or as a gift set.


Here's inspiration for our challenge! We'd love for you to join us. You can link up HERE. Just use at least one product from Canvas Corp, 7gypsies or Tattered Angels!

Thanks so much for stopping by! Be sure to check out the Step by Step tutorial, closeup photos and a supply list on the Canvas Corp Brands Blog. Have an awesome week friends!

Linked to:
SSS Monday Challenge - Warm Winter Wishes


Friday, November 30, 2018

Canvas Corp Brands - Christmas Blog Hop!

Hello friends! I am so excited to be participating in the Canvas Corp Brands Christmas Blog Hop today!! If you aren't familiar with Canvas Corp Brands, this wonderful company owns Canvas Corp, Tattered Angels and 7gypsies - three amazing companies themselves with beautiful, well made and trending products.  There is such an awesome assortment of goodies in the CCB Shop you'll have no problem choosing just the right products for your own projects! Today, I'm sharing a lovely Christmas Apron, and I can't wait to show you. 🎄 I started off by using one of the pre-sewn Canvas Corp canvas aprons. They are a great sturdy material and perfect to customize for any holiday or some special person on your Christmas Gift List!


I gathered a piece of the pretty blue ticking fringe and sewed it along the top of the apron.


I grabbed a pre-sewn canvas flower and sprayed it with Rose Gold Glimmer Mist and then added a cute reindeer button. I attached it to the apron with a safety pin so I could remove it if I needed to.


The Tattered Angels High Impact Paints were perfect to paint in the cute reindeer from an iron on transfer I found at Michaels. It looks so vintage and they remind me of the transfers I used to paint on as a kid!


Canvas Corp Brands Supplies:
Tattered Angels High Impact Paint: Kraft, Green, Rose Gold, Light Blue, White

Here's a list of all the blogs sharing amazing Christmas projects to inspire your holiday decorating and gift giving:

Karla Yungwirth You are here!
Thanks so much for stopping by! I can't wait to wear my new apron to do some Christmas baking and crafting! Be sure to head over to Karen's blog next to see her fabulous festive project and have a fun and crafty weekend!


Thursday, September 27, 2018

Canvas Corp Brands - Fall Blog Hop!

Hello Friends! Thank you so much for stopping by today. You are in for a treat! Today I am participating in a MEGA BLOG HOP!!!!!! There are 18 fantastic designers world wide that have come together to showcase terrific fall projects that you can recreate and put your own artistic touches on in your craft room. You have seen a lot of these designers featured on The Canvas Corp Brands blog using Tattered Angels, 7 Gypsies and and Canvas Corp products! Do you see a trend? This is the CCB Fall Blog HOP! Each of these designers have created a project to share with you on their blog. Some are offering prizes - including me! so please hop on through to each blog. If you are inspired we would love if you would share the hop with others 💓 We would truly appreciate it!

For my project for this fabulous fall hop I’ve created a pretty autumn wreath using some dollar store goodies I upcycled with lots of fun products from the Canvas Corp Brands Shop. Fall is my favourite season! I can’t help getting excited about the fall colours, sweater weather, and Pumpkin Spice everything! 


Here are the steps I used to create my fall wreath:

I sprayed a white dollar store grapevine wreath with Tattered Angels Rose Gold and Woven Burlap Glimmer Mists and let dry. Then I glued strips of Canvas Corp burlap around, using hot glue to attach the ends.


Next, I sprayed faux leaves and berries (dollar store finds) with Golden Lime and the Rose Gold Glimmer Mists and the acorns and pinecones with the Woven Burlap and Dark Vintage Green Glimmer Mists. The mica in the mists gave the fall foliage a lovely shimmer and shine and adds such a nice effect!


I sprayed the Tattered Angels Mixed Media Mini Origins 'The Vines' paper with various colours of Glimmer Mists and then fussy cut them out. This mixed media paper is just amazing to work with - so thick and perfect with water mediums. I added some Emerald Creek Thanksgiving Embossing Powder to parts of the leaves and heat embossed to add even more glittery goodness and added a bit of ink around the edges.


I finished off the wreath by gathering some Canvas Corp Red Hemp Rope into a circle and hot gluing it to the wreath, adding all my glimmered elements and some pretty Little Birdie Crafts handmade flowers. This wreath came together nice and quick and I just love how it turned out!


Here are a few closeups:


BLOG CANDY!

Be sure to comment below for a chance to win an envelope of Happy Mail! I will be sending out a small package of goodies with some fun crafty surprises included to one of the people who leave a comment by Monday, October 8th!! Winner will be announced Tuesday, October 9th


Here’s the full blog hop list-

  1. Scrappy Cafe (Betz Golden)
  2. Papierstau (Sanna Lippert)
  3. Marie Nicole Designs (Marie Heiderscheit)
  4. Steph Ackerman
  5. The Crafty Robin
  6. Monica Taylor
  7. Karla Yungwirth That's Me!
  8. Lynne Joncas
  9. Priya Satish
  10. Erin Reed
  11. Natassa Blazaki
  12. Peggy Lee Baker
  13. Nadine Carlier
  14. Jaine Drake
  15. Christine Santos
  16. Viktoriya Porechnaya
  17. Hema VelCraft
  18. Linda Israel

I am so excited to get out all my fall decor now and celebrate the season! 🍂 Be sure to hop over to the next stop on the list - 
Lynne Joncas and see the amazing project she’s come up with. 🍁 I hope you get lots of inspiration to start your next fall project!

Linked to:
SSS Wednesday Challenge - AG


Monday, September 17, 2018

Canvas Corp Brands - Canvas Challenge!

Good morning! Hope you're all having a fantastic week! I just wanted to give you a peek at a fun challenge on the Creative Studio Blog that the wonderful Crew Members at Canvas Corp Brands were given - to create a project using a piece of Canvas Corp canvas. Now, this was so fun, because there are so many wonderful canvas pieces in the shop!! I chose to work with a Canvas and Burlap Zipper Pouch and you can see here how I added a cross stitch pattern to the burlap side of the bag and then added a stitched banner, Architextures rub-ons, buttons and Tattered Angels mists to the other side!


This little zipper pouch would be perfect as a pencil case, a great place to tuck a gift in, even a makeup bag and I love how you can customize it yourself!


I cut a little rectangle out of canvas and stitched it to a piece of Canvas Corp cording to act as a little zipper pull.


This sweet cactus was so fun to stitch directly on the burlap using a pattern from Cross Stitcher Magazine. I cut a tea cup out of another printed canvas sheet and coloured it with Glimmer Mists to use a little plant pot.


The buttons I chose from my stash add some more texture and interest and match the colours I used. And, in case you're wondering... that background paper is from the Architextures collection!


Here's a look at the VIDEO of all the projects created-


Thanks so much for stopping by today! Be sure to head over to Creative Studio Canvas Corp Brands blog where you can see details on so many of these projects and a supply list for my project above - and if you haven't yet checked out that blog you'll definitely want to! There is amazing inspiration all the time!!