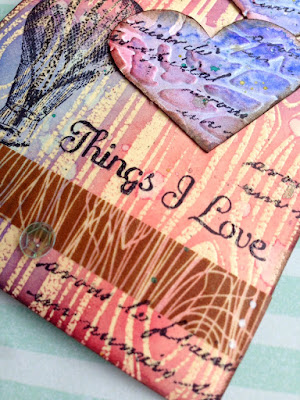
I'm retaking the Tim Holtz Creative Chemistry 101 class from Online Card Classes - and loving the review! This was the perfect opportunity to use some of the fun techniques Tim is so awesome at teaching. Here's the first side of my tag:
I started off by heat embossing with Versamark and clear embossing powder using a woodgrain stamp. Then, I used Distress Inks in Candied Apple, Blueprint Sketch, and Wilted Violet to blend my background, which created a neat effect where the embossing powder resisted. I used some Archival Ink to stamp on some stamps and added some CTMH woodgrain washi tape.
I added a couple more stamps and some hearts which I cut with my Cricut, embossed with my Cuttlebug, sponged Distress Ink on and stamped a script stamp on. The Ground Espresso Distress Ink was great to sponge around the outside edges of my hearts and tag.
Here's a couple close ups of the tag. I framed a butterfly with a wood piece and added some sequins from the 28 Lilac Lane collection.
Now, for the second side! I coloured the seam binding ribbon with Distress Inks misted with water. I just love this effect.
Since the dragonflies were already stamped with Distress Paint and dry, I smooshed Lucky Clover and Carved Pumpkin Distress Inks on my craft mat and added some water before laying the tag in it and drying several times in between to add some colour, using techniques from the Wrinkle Free Distress Technique. Then I used some Archival Ink to add some stamped images.
I added a little more colour around the edges with Ground Espresso Distress Ink and painted the butterflies using the Izink inks - love these! I even used the paint brush to flick on some extra paint and then misted with the Tim Holtz Mica Spray - so pretty!
Here, you can see where I've glued on some pearls and beads to accent the dragonflies and butterflies. These are also from the 28 Lilac Lane Collection. You can also see the pretty shimmer from that Mica spray.
You can check out another tag I created using the Art Foamies here! Thanks so much for stopping by today! I hope you have an awesome week!
Linked to:
Creative Chemistry 101 - Week 1 challenge -Use 4 or more Distress Ink Colours


No comments:
Post a Comment