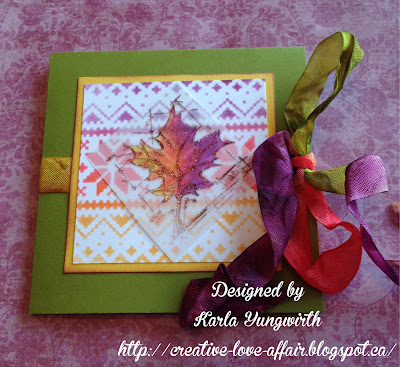
Hello friends! I'm back today with a post for the
Scrapendipity Way Of Life blog! Recently, I participated in a card swap and the challenge was to create a Fall card using a different fold than a regular 4.25 x 5.5" card. I found an Amazing Card on Pinterest and thought this would be the perfect one to create and decorate for my friends.
I started off with two 8x8 sheets of cardstock, since I was making 2 cards. I folded the cardstock in half one way and then the other to create four 4x4 squares. Then, on two of the squares I scored to create 4 triangles (see card below).
Here's a look at the yellow card. Erica was being my helper ;) I cut smaller squares of fall paper from the BoBunny Enchanted Harvest collection and cut them in half to create four triangles, which I added to the inside of my card. Two green squares were attached to the unscored 4x4 squares, and I added some stamping and paper. I heat embossed a pumpkin stamp and used Distress Inks to sponge on colour before layering it on my card.

For the cover, I coloured my seam binding ribbon with Distress Stains by rubbing them onto my ribbon and then spritzing with water to blend. I crinkled the ribbon and dried it lightly with a heat gun. I used A Tim Holtz stencil to create a background with Distress Inks in coordinating colors and layered it on top of my ribbon - I just love this stencil! It reminds me of a nice, cozy sweater! To finish it off I stamped a Tim Holtz Blueprint Leaf with brown ink on vellum and heat embossed with a crystal embossing powder. Then, on the back of the vellum I used Prismacolor Markers to colour in my leaf image. I love how the stenciled background still shows through!
Here's a look at how the card folds into itself - leaving you with a pretty 4x4 card!
Thanks so much for stopping by today. Here's a tutorial to create this
card on YouTube if you want to try it yourself! This is a great card to use up pretty papers you have in your stash and would be perfect for any holiday!
Linked to:
DL Art - Thankful Thursday October Linky Challenge
PDE Linky Party - Halloween Colors
613 Avenue Create - Create Your Own Challenge (Sights: pumpkin, sweater, sunflowers. Activities: leaves)
Crafting From The Heart - AG
Crafty Hazelnut's Patterned Paper - October Link Up
Pile It On - Use Fabric, Lace or Ribbon
Jo's Scrap Shack - AG


