Friday, March 22, 2013

Sister Birthday

It's my beautiful sister, Jann's birthday this week and of course I needed to make her an awesome card!

I recently picked up the February 2013 issue of a UK magazine Craft Stamper with some beautiful card ideas in it, and it came with a butterfly stamp included from Darkroom Door and then a bunch of ideas for using the stamp. I just loved this card and thought it turned out quite close to how it was pictured.

I stamped off the ink once before stamping onto the background to get a much lighter impression and then blended my Distress Inks over each layer. For the very top butterfly layer I stamped and cut an extra butterfly and attached it with foam tape to give it dimension and then covered it with Glossy Accents.


I also wanted to share a Kobo Touch case I made as a gift for her. I got the pattern from the Quilt Knit Run Sew blog. This is the second one I've made and I'm so pleased with how well it turned out and how easy it was to whip up!

 
I sewed on a piece of fabric and button hole/button to keep it closed.

 
This is what it looks like open, and you slide the Kobo Touch inside the pocket on the left


Hope you all have a fabulous weekend with lots of creative inspiration!


Thursday, March 21, 2013

Pattern Play Day 1, Card 2

I must say I really like this set of cards that Jennifer McGuire made on day 1 of the Pattern Play class at Online Card Classes!  I picked up a 6x6 paper pad yesterday and I'm feeling like this could be a new addiction! It is just so easy to put together papers for cards with a paper pack, and with the 6x6 the patterns are smaller than the larger 12x12 packs - perfect for cards!

For this set of cards I again used my Gypsy and cut out 3 inner hearts (from the George Cricut cartridge) each from four 4 3/4" pieces of patterned paper.  After everything was cut I could then switch the pieces up and end up with four similar, but different cards.  I also used the Heritage cartridge to cut four banners and by using clear stamps I was able to manipulate them into a curve to fit the banner.  I used a 30% cool grey Prismacolor marker to outline the banner and make some shadow lines in the fold area and used foam tape to give it dimension on the card.


After the pieces were cut I mixed and matched till I got combinations I was happy with.

Card 1
I cut out 3 white hearts, slightly larger than the patterned hearts and layered them one on top of the other.


Card 2
I sponged Distress Inks around the edges of each heart to give them definition and then layered them onto the card.
 
Card 3
 I put white cardstock underneath the hearts and popped them each up on this card.  I think this one's my favorite!


Card 4
 I traced around each heart with a Prismacolor marker in 30% cool grey and layered them on the card. I realized I had placed the paper slightly off center when I cut it so I put some flower rickrack on the left side.  Inside I stamped "for you".
 

I think you could use these cards for most any occasion just by stamping the insde with the appropriate sentiment. I'm thinking they will probably be birthday cards. Which one is your favorite?!
 

Wednesday, March 20, 2013

Pattern Play Day 1, Card 1

I'm taking a wonderful new class over at Online Card Classes - Pattern Play. It is a class with Jennifer McGuire and Kristina Werner and many more fabulous people to show you some great techniques for combining patterned paper and making some amazing cards. If you haven't checked out all the wonderful classes at Online Card classes it is well worth having a look!

My card is based on a card Kristina made on Day 1. I actually used the Cricut and my Gypsy and spaced three 1"circles about a 1/2" apart, and placed a piece of 2 1/2" wide patterned cardstock on the mat, centred over the area where the circles would cut. I also cut 2 more circles a bit larger in yellow and striped and a small heart. I then used foam dots to pop up the cardstock with the circles cut out after embossing an 'S' for Stephanie (it's her birthday this month!) on the top circle and gluing the yellow and striped cardstock down. I placed a piece of green floral paper beside this and used a white gel pen to make stitching lines down each side. Lastly I tied a piece of twine around the floral paper and rounded the corners.


Monday, March 18, 2013

Wishing for Summer - Crafty Sunday

Here in Calgary we were teased with a week or so of nice weather and now we are back to snow and mornings of -23 temperatures with the windchill. Bleck!

Amie, my 6 year old, and I decided to have a crafty day yesterday and I was wishing for summer - or at least spring! So I decided to make a summertime frame for Amie's room. I used a dollar wooden frame from Michaels and Mod Podged some yellow Cosmo Cricket paper onto the front. I used Broken China distress ink around the edges and right on the wood sides of the frame. I then layered embellishments, stickers and rub-ons from Pink Paisley in a summer theme inside and on top of the frame. I used some yellow Stickles brushed over the sun and stamped a sentiment from CTMH Treasures stamp set.


I used a banner stamp on Kraft cardstock, which I coloured with Tombow markers and cut out before gluing onto the picture.
 

Glittery sun!


Amie has a friend's birthday coming up and wanted to make him a birthday poster. She chose shiny blue paper and rocket stickers and then added blobs of a white paint pen, which she wiped with a tissue to create a shooting star effect.  She also used gel pens to add details and an Amy Tangerine date stamp as well as stamping with a banner stamp coloured with Tombows!


It was nice to do a couple quick crafts on a snowy Sunday.  Sometimes it's hard to pick just one thing to do out of all my addictions (oops, hobbies!) - crochet, sewing, cards, scrapbooking, cooking! I think next time Amie wants to sew a tote bag, so that will be fun :)
 
I'm entering this post into a Design Team call at the Our Crafty Girls blog.
 
Happy Monday!!

Congrats!

Having 3 girls spanning from 1 to almost 25 means everyone is going through a different stage of their life. My youngest is walking and just learning to sound out words and has realized screaming is an effective way to let her 6 year old sister know that she's bugging her. My 6 year old is loving kindergarten, meeting new friends and trying to test the limits of her parents' authority. And my beautiful 24 year old has just announced she's engaged!

We are going out to supper with her and her fiancé and his parents next weekend so I wanted to get a card made for them. I decided to use this week's sketch #2 from Simon Says Challenge Blog as the basis for the card. I die cut a butterfly tag from the Art Philosophy Cricut cartridge, my favourite cart, and first rubbed it into pools of Tim Holtz Distress stain, one of my fav products, and then spritzed it with gold mist. I layered it over a piece of cardstock, first coloured with green Distress Stain and then embossed with my Cuttlebug - a favourite tool! I cut out two hearts, a scroll and a square shape with the Cricut, another fav tool, and the Art Philosophy cart and used gold embossing powder on the scroll and square and a gold pen on the hearts. Added a couple gems for bling and used a Tim Holtz stamp (fav!) on the inside.


I hope Steph and her fiancé will like the card, but more importantly I hope they will have many, many happy years together!

Challenges-
Scrapbooker's Paradise - use your favourite products. See mine listed above!

Simon Says Stamp - sketch

Die Cuttin' Divas - Green and Gold

Wednesday, March 13, 2013

Happy Birthday, Friend

Once your kids start school there is a definite increase in birthday party invites! I think I may need to keep a stock of boy and girl toys from Costco on hand and start having a bunch of cards made ahead of time!

Amie was invited to the 4 Cats Art Studio for a little boy's party. They have very cool parties there, but you definitely have to wear clothes that are ok to have paint splatters on. We wore the same clothes from the last party there - and now yellow joins the pink and purple splatters from the last visit! We actually framed the splatter art poster from last time and hung it up on the wall.

Of course, having 3 girls means I have more pink, flowery paper and embellishments on hand than boy stuff, but I pulled out some shiny silver and blue cardstock and used some stickers from the Rocket Age 12x12 shape stickers page by October Afternoon. I embossed a 'Make A Wish' sentiment with Silver Tinsel embossing powder on a hand cut banner and followed a sketch from this week's challenge at the Scrapbookers Paradise blog and Amie was all set!

Challenges:

Playing In Paradise - sketch

Drunken Stampers - Birthday theme


Envelope

Amie's framed splatter art!

Monday, March 11, 2013

Happy St. Paddy's Day

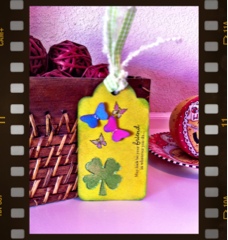
Not that I'm much of a St. Patrick's Day celebrator; I'll probably have a glass of wine instead of green beer, but I thought it would still be fun to make a cute green tag in honour of the day!

I cut my tag from the Cricut Art Philosophy cartridge. The funny thing is I searched for St. Patrick's Day images but couldn't find anything within the cartridges I owned on my Gypsy. I was going to cut a butterfly tag and make something from that when I spied the clover!

I used Dylusions spray inks to mist Kraft cardstock, which I had cut two tags from, one with the clover cut out and one plain. I misted the top tag over the back first, using the clover as a mask to make the shape, which I outlined with white gel pen. Then I placed the cut out image over the sprayed clover and misted again to colour the rest of the tag back. On the other side of the back tag I used Distress inks to colour in the part of the tag that would show through the clover cut on the front. I misted with gold spray and glued the two tags together. I stamped the sentiment and butterflies with a Close To My Heart stamp set, Pair-a-Phrase. I gave everything a light spritz with the gold spray and coloured in the butterflies with coloured pencils, then added a few Stickle accents and some green gingham ribbon and cream yarn.

I hope you all have a fun week with lots of luck!

I used Stickles to outline the cut out clover


I used the cutouts from two butterfly tags I die cut as well and popped them up with foam tape after using some Distress Inks to colour them in. This lucky sentiment from CTMH was perfect!


Tag back with misted and outlined clover
Challenges entered:
 
Simon Says Stamps - A bit o' green
Fantabulous Cricut - Luck o' the Irish