Showing posts with label sewing. Show all posts

Monday, May 4, 2020

Sew Sweet Pea Love Pattern with Cricut and a Giveaway!!

Hello friends! I hope you had a great weekend! I'm back today with a fun project you just might want to try, and a fun GIVEAWAY below!!  I made this as a gift for my niece and actually used this Canvas Tote as the gift bag to give her birthday gifts in! If you haven't heard of Sew Sweet Pea, you'll definitely want to check them out! They are a family run business with beautiful sewing patterns that can be cut with your electronic cutters using the SVG pattern file! Now, if you don't have an electronic machine you can still cut out their beautiful patterns by hand using the downloadable PDF. They also include lots of information on how it goes together and even give you instructions on how to applique and what kind of stitches you can use! I decided to cut the Love Cushion Applique Sewing Pattern pieces out of Natalie Malan Patterned Iron-On Vinyl using my Cricut Maker, but you can just as easily cut them from fabric. 
 I love that the Love word and hearts actually form a heart! I thought these pretty Patterned Iron-On colours actually looked like fabric! Don't forget to mirror your cuts when you're using Iron-On! One of the files that comes in the download is actually mirrored so you won't forget - and yeah I'm saying that because you know I forgot, lol! I left my hearts 'backwards' but I had to recut the Love... Oh well!


Here's a quick video where you can see how easy it is to upload this pattern into Cricut Design Space! Don't forget after you have it you can use it to cut fabric, vinyl, iron-on, paper and more!!


I trimmed close to the backing material so I could layer each heart and letter on and iron them on at one time with my Cricut EasyPress 2 and the EasyPress Mat. I'm telling you the EasyPress 2 and Mat is a game changer! I pressed for the recommended time and then removed the liner pieces and I love how it turned out!!


Now for the Giveaway!! I have 3 vouchers sponsored by Sew Sweet Pea!

Leave a comment telling me if you like to use fabric or iron-on vinyl (or something else!) to make a special gift for yourself or someone else.... Extra entry if you tell me what your favourite Sew Sweet Pea Pattern is!!
3 Vouchers to be won 1) 50% off your order, 2) $10 Gift Voucher, 3) $25 Gift Voucher!! -Leave your comment(s) by Friday May 8 @ 11:59 MST - winners announced Saturday, May 9th!
There are 4 places to leave comments for a chance to win - 1)On the YouTube video 2) On this blog post, 3)On the Sew Sweet Pea Post on Instagram and 4) On the Sew Sweet Pea Post on Facebook


Thanks so much for stopping by! I hope your inspired to get creative this week, and have an amazing day! 


Thursday, February 20, 2020

Flower Garden Applique with Video!

Hello friends! I'm very excited to share a new crafty company I came across - Sew Sweet Pea! Even though I primarily share papercrafting projects here, I do enjoy other crafts - crochet, home decor, vinyl designs with my Cricut, sewing & needlework - including applique! Sew Sweet Pea has beautiful applique patterns on their site, wonderful instruction references and what I really love is coordinating SVG patterns so I can easily cut the images and shapes with my Cricut Maker! Here's a look at the super cute pillow front I created with Cricut Felt shapes using the Flower Garden Applique Pattern - cut in no time precisely with the patterns uploaded into Design Space.


You can get the Flower Garden Applique Pattern FREE when you sign up for the Sew Sweet Pea Newsletter! The files come with fabulous PDF file resources explaining exactly how to applique and put together your beautiful Flower Garden!


Here's a look at the video where you can see how easy it is to upload the applique files to Cricut Design Space and start creating!


Thanks so much for stopping by! Be sure to head over to Sew Sweet Pea to check out all the other beautiful designs, and have a wonderful and relaxing weekend!! PS Watch for an upcoming post where I'm going to create an envelope pillow with this pretty piece 💮


Thursday, June 20, 2019

Customizing Baseball Gifts Using The Cricut Maker with Video!

Hello! I am so excited to finally have a Cricut Maker!! I was lucky enough to find it on TSC, which is the Canadian Shopping Channel, and I used a 20% off coupon, making it super affordable with their interest-free payment plan! I previously had an Explore, which I loved, but I felt this was the right time to upgrade and take advantage of the new features the Maker has, including the ability to cut fabric easily with the rotary blade! With a birthday present needed for a little boy having a baseball themed party I thought this was the perfect time to break it open and get going. My daughter, Erica, who is 7 really enjoyed helping make this present for her little friend, and I enjoyed the crafting time with her!


Here's a look at the VIDEO where I'll show you step by step how easy it is to create two quick, easy, personalized gifts.


I was surprised and so pleased at how easily the Cricut Maker Rotary Blade cut through fabric! This was a white fleece material and I was a bit worried about how much residue it might leave on the fabric mat, but it came off completely clean. The Everyday Iron-On adhered perfectly to the fleece and we stitched up the pillow in no time.


Erica's friend was so excited to get his new shirt, and she thought it was an awesome gift to give! She was so proud of the fact that she helped to make it.


Thanks so much for stopping by! I'd love to know if you have an electronic cutter, and if so, which one? Have an awesome crafty week friends!


Thursday, February 21, 2019

Paper Doll Canvas with Gyspy Seamstress Papers!

Hello! I am so excited to share a pretty canvas with you that I created for the Canvas Corp Brands blog using the gorgeous 7gypsies Gypsy Seamstress Mixed Media Pad. I love vintage sewing ephemera, and this collection is full of just that! I'm always reminded of my grandmother, who loved to sew and draw my sister and me paper dolls, and this canvas was the perfect combination of those two things! Be sure to check out the video below where you can get a look at exactly what is in this beautiful Mixed Media Pad.


I used Mod Podge to add layers of the pretty papers to a canvas after inking the edges with Distress Oxide Ink, and I created some dimension by using foam tape and curling edges. This cute Julie Nutting paper doll was just perfect to add to the top of the canvas!


I used some Tattered Angels mists to add colour to the rick rack from my stash, and even added a vintage package of the rick rack that I found in my ribbon drawer. A bit of Glossy Accents added a realistic effect to the buttons and snaps I cut from the patterned papers.


Here's a look at everything you get in this beautiful Gypsy Seamstress Mixed Media Pad in the video below!


Thanks so much for stopping by! Be sure to head over to the Canvas Corp Brands blog to get a supply list and see what all the other Crew Members came up with for this challenge!


Friday, March 2, 2018

Canvas Corp Brands - Coffee Challenge & Tattered Angels Video!

Hello! I hope you've all had a fantastic week! I'm sharing a couple recent projects I've created for Canvas Corp Brands, which includes 7gypsies, Tattered Angels and Canvas Corp. There are so many fantastic goodies these companies have - it's certainly not hard to create beautiful things with such a great selection!

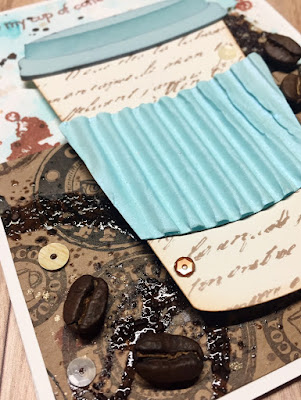
First up is a Crew Challenge we had over at the Creative Studio blog - Tea & Coffee, and our challenge was to use real tea or coffee in our project! I love both tea and coffee, but if I had to choose then coffee would win 😉 so I created a gift set for my husband's birthday that used Canvas Corp Brand papers and canvas fabric along with Tattered Angels mists and real coffee grounds and beans.


I used the pretty TA Glimmer Mists to make a watercolour background and layered on some CC Coffee Papers before mixing coffee ground with UTEE to create a custom embossing powder to use on a CTMH coffee ring stamp. I used a PPPR coffee cup cutfile and the cool TA corrugated mistable paper to create this neat layered cup. A few pretty SpiegelMom Scraps sequins add a bit of finishing bling along with some real coffee beans.


Inside, I used the coffee ring stamp along with a Pretty Pink Posh sentiment and the Java Great Day by Pretty Cute Stamps.


My hubby has a couple stainless steel coffee mugs he uses to drink his coffee and tea and his hands always get cold so I wanted to make him a custom Coffee Sleeve that he could adjust to fit both mugs. I used the printed Canvas Corp 12x12 Beans & Bags Canvas Sheet and a Pinterest Pattern HERE to stitch this up for him. (Just as an FYI I would make the pattern a bit longer if I was to make it again.) He loved his card & gift when he opened them for his birthday!


The second project I'm sharing is 'How To Make 15 Backgrounds With Tattered Angels' over on the Tattered Angels YouTube channel. This was a fun project to make using Tattered Angels Mists and Paints. There are literally so many possibilities! Just think about how many projects you could whip up once you had a bunch of backgrounds completed. 


Here's a look at the video where I take you through all the steps to create each background:


Thanks so much for stopping by today! I hope you have a fantastic weekend!!

Linked to:


Wednesday, July 26, 2017

Kitty Bee Designs - Cute As A Button Kitty!

Hi there! I'm back today to share a card with you using the super sweet Kitty Bee Designs Sewing Kit digital stamp that I'm featuring on the Kitty Bee Designs blog. I had so much fun making this card. Sewing always reminds me of my Nanny - who taught me to sew - and brings back many happy memories. So, of course I was so excited to create a cute card using this little sewing kitty!

I printed the image out on white cardstock, coloured it in with Prismacolor and Hobby Colour Markers, and used this awesome Cool Tag Four Die Set from Your Next Stamp to create a tag base. I love the stitching detail on this tag! I just had to grab a 'cute as a button' stamp from Pretty Cute Stamps as a sentiment on the front.


The bright colours in the BoBunny Believe 6x6 paper pad (one of my fav's) was perfect as a background for my card! I popped up the tag to give some dimension and added half pearls from 28 Lilac Lane and SpiegelMom Scraps sequins.

Inside I used a Thank You sentiment from Your Next Stamp and the Sew Much from Pretty Cute Stamps and layered a coordinating piece of patterned paper along the bottom. I just recently picked up some 110 lb white cardstock for cardbases - and can I tell you how much I love it!!

Thanks so much for stopping by today! I've had a lot going on this week - so if you haven't had a chance to check out all the fun things I've been sharing, be sure to check out all the posts this week so far! From Christmas to Canada Day - it's been a lot of crafty goodness ;)

Linked to:
SSS Monday Challenge - You've Got The Edge (stitching around the edge of the tag)
DL Art - Thankful Thursday July Linky Challenge


Tuesday, December 20, 2016

Gifts For Baby Emily!

On November 24th my baby sister, Rayme, had a beautiful baby girl - after a very long and hard labour. She deserves a medal for all she went through! I am a very proud Auntie of new little Emily - and I think she's gorgeous!!

(And, I finally downloaded the Pic, Tap, Go app (that I used to brighten this pic up) and love it! Can't believe I waited so long to get it!!) So, of course I needed to send Miss Emily some handmade gifts and thought I'd share them with you too! I had this cute quilt topper in my fabric stash and didn't even realize it had the same images that are in the Kate's ABC's Cricut cartridge!

I cut lots of images from this adorable Kate's ABC's cartridge and Mod Podged them onto a canvas background covered with a background of patterned papers. The sunshine and clouds are from a Miss Kate Cuttables SVG download and I welded the diecut letters before cutting them out. After I glued all my images down I traced around them with a black pen and used some brown Distress Marker to watercolour in some shading. A bit of white gel pen and some stencilled glittery hearts add the finishing touch.

Since the quilt top was narrow and could have been used for a wallhanging, I decided to add a strip of pink fabric on each side to create a crib quilt size. I used some coordinating flannel fabric for the back of the quilt. Here's Erica showing it off! She was very excited to have a new cousin :)

And lastly, I had to make one of these adorable little crocheted Froggy Security Blankets from some pretty, soft baby yarn! I made one of these for Erica before she was born and she still sleeps with it. <3

My sister, Rayme, got our package the day before she went into labour. I'm happy to say both mom and baby are healthy and happy and we are so pleased to have another little member in our family! Thanks so much for stopping by today! I hope you're enjoying these last few days leading up to the big day.

You can follow me on social media at these links here:

Linked to:
Sunny Day Crafting - AG
DL Art - December Linky Challenge
Simon Says Stamp Wednesday Challenge - Gift It
Crafty Hazelnuts Patterned Paper - December Challenge
DIY Mommy - Link Up Party


Sunday, June 5, 2016

Stitched With Love!

Hi friends! I hope you all enjoyed a relaxing weekend with a bit of crafty time for yourself. I'm sharing a card with you today using the Pretty Cute Stamps Sew Amazing stamp set. I love to sew, but don't do it often enough right now - however, this stamp set lets me have fun with all the stitchy elements and play with paper too!

 I started off by cutting a Project Life card down a bit. It already had this fun, funky stitching printed right on it! Perfect! I used some Distress Ink to sponge some colour around the edge before adding it to a folded card. I love the Stitched With Love sentiment from the stamp set and stamped it directly onto the PL card. I used my circle punches to punch out a few fun patterned paper items and added a stamped button from the set.


I stamped the fun sewing machine in the set directly onto my background as well as on a piece of Maggie Holmes patterned paper. Then, I fussy cut around the main part of the patterned paper stamped image before adding it to my background. A bit of coloured pencil highlighted the edges. You can see that I added some glittery purple thread onto my spool before attaching it!

Inside, I used the piece of the PL card I cut from the front and stamped the Just For You sentiment, also in the set. I added some zigzag and running stitches stamps and some stamped buttons that I used Distress Inks to colour. I wrapped some more shiny purple thread directly onto my cut out spool before adding it inside the card as well.

A few sequins and a pretty button from the 28 Lilac Lane collection and a couple rhinestones from my stash, add a bit of bling!

Here's a look at this awesome stamp set:
Sew Amazing
 Thanks so much for stopping by today! Hope you have a wonderful week :)


Sunday, July 26, 2015

Stitched With Love!

Happy Monday everyone! I'm sharing a card over at the Pretty Cute Stamps blog today - using one of the new sets from the June/July release Sew Amazing. I love all the fun little details that come with this set!! I used the straight stitch stamp around the edge of some Cosmo Cricket paper using Vintage Photo Distress Ink. Then I stamped some buttons on patterned paper circles before punching out with a circle punch. I added a sweet vintage looking patterned image from the paper pack that I 'glittered' the edges of and then popped up my buttons to surround it.


The sewing machine image was stamped from the Sew Amazing set onto a tag that was part of the paper pack as well as on some patterned paper, which I then cut out and glued to my tag. I dipped the bottom of my tag into glitter to add a fun effect, and then I stamped a sentiment from the set under my tag. I love the script on this stamp!


I used the zig zag stamp from the set as well as some more buttons and another sentiment to the inside before edging with some Distress Ink.


Here's a look at this awesome set!
Sew Amazing

Thanks so much for joining me today! Don't forget to stop over at the Pretty Cute Stamps store to see all the goodies there too! I hope you have a beautiful week with a little time for yourself to have some crafty fun :)


Sunday, July 12, 2015

Pretty Cute Stamps Feature - Sew Amazing!

Happy Monday! I'm sharing the most adorable sewing stamp set with you today from Pretty Cute Stamps - Sew Amazing!

Even though I don't do as much sewing as I used to, I still love it and it always reminds me of my Nanny, who was an amazing seamstress. So, as soon as I saw this super cute stamp set in the June/July New Releases I knew I had to have it!

I paper pieced the sewing machine and sweet pincushion, which added the little face to. Then I stamped my white background with a zigzag stitch border, using a marker directly on the stamp. As you probably know I'm a big fan of all the cute sayings included with each set, and I stamped a sentiment directly on a handcut banner before adding a stamped paperpieced heart button.


I coloured my needle and thread in with Distress Markers as well as adding some highlights to my buttons and paperpieced images.


Inside, I added the rest of my sentiment, the straight stitch stamp and some more cute buttons!


Here's a look at all the incredible stamps you get in this set!
 Sew Amazing
Thanks so much for joining me today! I just love sharing this wonderful stamp company with you! I hope you'll check them out - you can stop by their blog at http://prettycutestampsblog.blogspot.ca/ to see lots of amazing inspiration as well as a new monthly challenge!


Friday, March 22, 2013

Sister Birthday

It's my beautiful sister, Jann's birthday this week and of course I needed to make her an awesome card!

I recently picked up the February 2013 issue of a UK magazine Craft Stamper with some beautiful card ideas in it, and it came with a butterfly stamp included from Darkroom Door and then a bunch of ideas for using the stamp. I just loved this card and thought it turned out quite close to how it was pictured.

I stamped off the ink once before stamping onto the background to get a much lighter impression and then blended my Distress Inks over each layer. For the very top butterfly layer I stamped and cut an extra butterfly and attached it with foam tape to give it dimension and then covered it with Glossy Accents.


I also wanted to share a Kobo Touch case I made as a gift for her. I got the pattern from the Quilt Knit Run Sew blog. This is the second one I've made and I'm so pleased with how well it turned out and how easy it was to whip up!

 
I sewed on a piece of fabric and button hole/button to keep it closed.

 
This is what it looks like open, and you slide the Kobo Touch inside the pocket on the left


Hope you all have a fabulous weekend with lots of creative inspiration!