Friday, October 28, 2011

Mosaic Christmas Ornament and Tutorial

This is a cute Make & Take that Scrapbooker's Paradise did for Toonie Thursday this week.  They always have such cute cards, but I especially liked this one as this technique could be used for so many things! I'm using mine for ornaments, but you could make tags, coasters, cards, etc, and not just for Christmas.

 The Make & Take (front and back)

After buying only a few supplies I went home and make a couple more so far with my 4 year old. I'm thinking everyone on my Christmas list would love one of these!


 For this one I used a strip of paper across the middle instead of ribbon tied on after.
 How to:
Cover a chipboard coaster with Sookwang Tape on each side and trim around with scissors to remove extra.  Cut up strips of desired paper into random shapes and place onto coaster with small spaces in between.  Sprinkle embossing powder onto coaster, which will stick to the Sookwang Tape in the spaces.  Tap off and heat emboss. Repeat with other side. Tie ribbon around coaster and ink edges with desired ink color.  I used a fast drying pigment ink pad, directly on the coaster. Choose die cuts or stickers and pop up with foam dots or apply directly to the coaster.  Embellish with glitter if you wish, and then punch a hole in the top center and tie with ribbon.

Tip: Good idea to use Teflon coated scissors if you have them to avoid having to clean the sticky tape off your regular scissors.  Also, scraps of the tape can be overlapped to cover your coaster and will not show seams once you cover and emboss.


Linked to Friday Link Party at Creation Corner, Simply Link Party, Show and Tell Friday and Scrapbookers' Paradise Facebook page.

Wednesday, October 26, 2011

Froggy Security Blanket

I saw this totally cute frog blanket in the Babies & Kids Fall 2011 issue of Crochet World and had to make it.  Two months to go till baby's arrival and so many ideas!!

I used Red Heart Soft Baby Steps yarn in 'Binky Print', which is sooo soft, for my froggy, and I actually embroidered the eyes instead of using the two different crochet colors (white and main) for the eyes.

Love this magazine!


I'm linking up to Tip me Tuesday, Made for you Mondays, and Too Cute Tuesdays

Friday, October 21, 2011

Playing in Paradise #38

I found an unfinished wooden shadow box at Michaels a while ago and wasn't sure what I would do with it. Halloween seemed like the perfect time to use it! I painted the box with black acrylic paint and then made each insert as if I was making individual card fronts. I was able to use up some rub-ons and halloween ephemera from my stash and I picked up a cool Inka-Dinka-Do stamp set to use on it, as well as some Michaels stamps and a C.C. Designs cute witch. I stuck the inserts onto the box with glue dots and added glitter and some Glossy Accents.

When I saw the challenge from Scrapbookers' Paradise blog, to make a halloween card or project, I just had to enter this!


Happy Halloween!

Sweet Sunday Sketch Challenge 139


As alway, Karen at The Sweetest Thing has a great sketch challenge this week! I actually turned the card on its side for this challenge.  I embossed the green cardstock with a the Swiss Dots Cuttlebug folder, and then layered on the pink and yellow stripes, in a non-traditional Halloween color theme.  I then layered on a digi image from Bugaboo Stamps, which I colored in with my Prismacolor markers.  I popped up the banners that I stamped from a My Mind's Eye stamp set.
This little witch is so cute, and I printed it directly onto cardstock, after opening it in Microsoft Works, resizing it and lining up two rows of three images, without changing any printer settings.  The markers, which are alcohol based, worked great with the printer ink too.  Bugaboo Stamps has Freebie Friday where they offer a free digi stamp on Fridays, so head over....

Hope everyone is having a Happy Halloween!!

Thursday, October 20, 2011

Scrapbookers Paradise Toonie Thursday Card

Today Scrapbookers' Paradise had a really neat $2.00 card! The red and blue cardstock are woven together and then embossed with a Cuttlebug folder and lightly sanded. We applied a silver Tim Holtz product to the car and arrow and then heated the product with a heat gun, making it pliable.

They also had a Christmas demo with red and green woven background, which was then embossed with a Christmas tree image that was very cool!

Baby Crochet

I've recently taken up crochet again and I'm so excited! There are so many wonderful patterns available and great websites. These cute baby items are from the Crochet World for babies and kids issue.  This issue is downloadable, and you can actually get on online subscription for Crochet World for only $15.97.

My 4 year old is asking for a pair of mittens, just like baby.  She was very excited to pick out her yarn. The larger size is worked the same, just with a larger yarn and hook!

My grandmother taught me to crochet when I was younger and I wasn't sure how easy it would be to pick up again, but I was very pleased to be able to quickly whip these up. You-Tube is also great to help figure out a stitch you're stuck on!


I also love the Lion Brand site which has tons of free patterns and helpful tidbits and Homemade Tip Junkie site, where you can search for instructions for lots of great crochet patterns (and other crafty stuff) submitted by readers!

Submitted to Tip Me Tuesday!

Tuesday, October 18, 2011

Thanksgiving

I like to make something special for the Thanksgiving table when we host, and I saw this cute pumpkin tutorial on, I believe, Tip Me Tuesday on www.tipjunkie.com.  Their newsletter is so awesome! So many great ideas from so many talented and crafty people. So, just wanted to pass along how to make these cute little pumpkins...


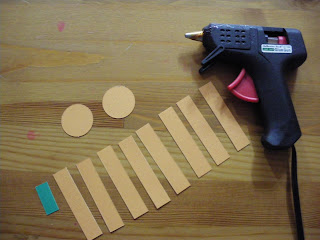
 Cut 8 strips of cardstock, 2.5" x .5", 2x 1" circle and a small green stem
 Start by gluing one end to circle. I found gluing opposite ends helped get an even placement around the circle, and then added in the last 4 strips between them.
 Gently curve the strips with your fingers.
 Glue the open ends under the second circle, using a chopstick to push on last strip.
 Ta-Da!
I made one for each place setting at the table, but I'm sure you could resize and make it larger too.
Of course you can place these around for little fall/Halloween decorations as well!

 My sister made a beautiful Thanksgiving card!

My 11 year old niece also brought an amazing Thanksgiving card!
Two very talented ladies :)

Monday, October 17, 2011

Crafty Wreath Making

I decided to try my hand at wreath making since I had some silk flowers and wreaths I bought at Michaels at the end of the summer season. To coordinate the colors I bought some Krylon spray paint (with my 40%off coupon!) and some wire edged ribbon, gold ornaments and mauve picks on sale. I used my Imaginisce glue gun to glue it all together.

The spray painting was easy to do; I took the flowers apart and put them into a box with one side cut down and sprayed them outside, of course. They dried fairly quickly and I was able to make the wreath in no time.

Supplies

I'm linking up to Tip Me Tuesday!

Saturday, October 15, 2011

Recent Card Making Endeavors :)

I'm a little behind on doing some postings... so thought I'd share a few cards on one post today!  I love that Scrapbookers' Paradise has Toonie Thursdays.  I can bring my 4 year old, who loves crafting, and she'll sit quietly and help me put a quick card together.  Often they will feature a new technique or product to use and what is more fun than getting to play with paper?!

In this card we stamped an image, then colored it in with the sponge pads and Distress Inks after stamping with a clear Versamark pad and a 'writing' stamp. Neat effect.


 This is a gift card holder stamp, which we cut apart and stamped on various papers before reattaching.  The lid opens to reveal the slot for the card!  We embossed the coffee cup area before attaching and pleated some cool paper tape.


 This is my own card I made for a cute Fall card idea.  I used a Hero Arts digi stamp I downloaded from Two Peas in a Bucket and colored with Prismacolor markers. It is a set that comes with a few versions of adorable owls!

 Inside view - I put a little guy in the corner of the inside of my card :)


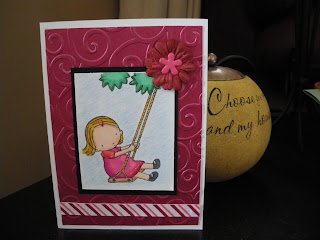
I made this card for a friend's birthday. I embossed the red cardstock, attached my colored image and added a flower and ribbon.  Very easy, but turned out pretty cute!

Right now Two Peas in a Bucket has a free digi kit from Hero Arts with tulips, paper, buttons and other extras you can download.  It's worth checking back every once in a while to see what they have.

http://www.twopeasinabucket.com/shop/hero-arts/83753-free-digikit-ha-sketch-tulips/?filters=_hero+arts_%2Fhero-arts-digital%2Ffree%2Fdigital-kits