Showing posts with label Scrap 'n Stamp. Show all posts

Saturday, March 24, 2018

Scrap 'N Stamp - Side Order Blog Hop!

Hi friends! I'm really excited to be part of another awesome blog hop with the Scrap 'N Stamp team, and this month we are featuring the fantastic Tim Holtz Side Orders!! If you've come from Amber's Blog you're in the right place. If you want to start at the beginning, head over to see Tara at the Scrap 'N Stamp Blog. Wait till you see the amazing projects everyone creates with these cool Side Order sets...


Today I'm using the Side Order of Love set to create a beautiful summery wedding card! These are adorable little sets that come with some mini dies and a coordinating embossing folder. You can use them in the Tim Holtz Side Kick or in your regular diecutting/embossing machine.  I used my Cuttlebug for my project, but I'm really tempted to get that adorable Side Kick ;) Scroll down to see close up photos and a link to my Process Video below where I have a tutorial to create this Double Z Fold Card.


This wedding image from the Tim Holtz Paper Dolls pack was just right to add to the front of this card! I coloured in the flowers to make them pop.


The Emerald Creek Northern Lights embossing powder created a cool resist on the tag that I embossed with the mini heart embossing folder included in the set. I added some Tattered Angels mists to the background and then layered on the adorable envelopes cut from the dies. I used the Love die to cut the sentiment a few times and stacked them to create a chipboard-look.


 I used a pretty Kaisercraft paper pad to cover the folds - I love the soft colours! Here you can see what it looks like when it's opened up.


I have a spot to write a message and even added a little envelope on a paper clip, which would also be perfect for a planner! Aren't those Tim Holtz Small Talk stickers sweet!!


Inside I stamped a greeting from Your Next Stamp. I love the little heart candy box! And don't forget you can use the heart and bow separate - so many possibilities.


I finished off with a few SpiegelMom Scraps sequins and really love how this card turned out! You can see that this Side Order of Love is not just for Valentines, but has so many uses. I never get tired of using hearts on my projects 💜


Here's the link to the Process Video where you can find my tutorial to create this Double Z Fold Card - 


BLOG CANDY!!

Scrap'n Stamp is giving away 3 Side Order Sets! So make sure to take a moment to comment on all the designers' fabulous work before April 2nd. Winners will be announced April 4th and must email Scrap'n Stamp to claim their prize! GOOD LUCK! This prize is open internationally.

Here's the Blog Hop line up:

Tara Nixon Cox @ The Scrap 'N Stamp blog

Amber Trubiak
Karla Yungwirth - You are here!
Nancy Frustaci
Julia Chupik
Karen Warner

Thanks so much for stopping by today! Be sure to head over to Nancy's Blog next to see her beautiful project - and you can check out the Tim Holtz Side Orders at the Scrap 'N Stamp store. Have an amazing, crafty weekend - and good luck on the giveaway!

*I've used affiliate links to the Scrap 'N Stamp store (Canadian Shipping only) to support my blog. Thank you!

Linked to
SSS Wednesday Challenge - Floral Frenzy


Saturday, February 3, 2018

'Getting Fab With Foil' Blog Hop with Scrap 'N Stamp!

Hi friends! I'm really excited to be part of another awesome blog hop with the Scrap 'N Stamp team, and this month we are featuring the 'Foil-tastic Ranger Foils!! Today I'm playing with the Brights Foil Sheets and the Vintage Foil Sheets, but there are lots of other colours too! If you arrived here from Amber's Blog, you're in the right place. If you want to start at the beginning, head over to see Tara at the Scrap 'N Stamp Blog. Wait till you see the amazing projects everyone creates with these lovely Foil Sheets!

I have only played around with foiling a little before now, but I can tell you I am addicted!! I don't have a laminator, and even though I love the look of the foiling techniques using them I honestly wouldn't go out and get one. So, I was really excited to see that you don't need a laminator to use these fabulous Foil Sheets! I played around with a Quickie Glue Pen, some Be Creative Sookwang Tape and Ranger Sticky Embossing Powder to get fun foil looks to create embellishments for this DIY Traveler's Notebook. I'll give you a close up look at each page, but be sure to check out the video where I show you all the beautiful details and how easy it is to add foil to many different surfaces! Here's the cover using some pretty Paige Evans paper, some CTMH stickers, Tim Holtz Botanicals Embellishment Diecuts and SpiegelMom Scraps sequins.

I love the effect you get with the Be Creative Tape and several different colours of foil. And, of course this little Julie Nutting paper doll needed a bit of bling on her pretty outfit!

A journaling card with a Tim Holtz Small Talk sticker turns into a flap using some washi tape.

Inside reveals a couple of sweet girls from the Tim Holtz Paper Dolls.

These adorable vintage papers are from October Afternoon, and I love the gold accents I was able to add to the cork arrow!

A cute little lady bug peeks out from this flap.

Seriously, you can add foil to everything!! I stamped on these Memory Box Postage Stamp Diecuts with a Dylusions background stamp, used the Quickie Glue Pen and foil accents and layered them with a pretty diecut flower from the SpiegelMom Scraps shop that I also foiled.

Using the same flower stamp directly on my paper with Versamark Ink and Ranger Sticky Embossing Powder allowed me to add foiled flowers to this page. 

More diecuts accented with different foil colours and a chipboard star add a vintage feel to this page.

A little Kaisercraft tag peeks out of a pocket made from a diecut element in the TH Botanicals pack.

How cute is this Paige Evans sofa and the Julie Nutting doll?!!

On my last page I used a beautiful image by Jane Davenport cut out of some packaging and a few more foiled elements.

I was so happy with how this Traveler's Notebook turned out! You can see how I create the notebook, and how I add the foils to lots of different surfaces using the three adhesives above in my YouTube video HERE. I'd love it if you'd like and subscribe 😍

BLOG CANDY!!

Scrap'n Stamp is giving away a Ranger Foil Sheet package for every stop on the blog hop! So make sure to take a moment to comment on all the designers' fabulous work. Winners will be announced Saturday, February 10th, and must email Scrap'n Stamp within 2 weeks to claim their prize! GOOD LUCK! This prize is open internationally.


Here's the Blog Hop line up:

Tara Nixon Cox

Julia Chupik
Amber Trubiak
Karla Yungwirth - You are here!
Nancy Frustaci
Karen Warner

Thanks so much for stopping by today! Be sure to head over to Nancy's Blog next to see her beautiful project - and you can check out the Ranger Brights Foil Sheets and Vintage Foil Sheets at the Scrap 'N Stamp store. Have an amazing, crafty weekend - and good luck on the giveaway!

*I've used affiliate links to the Scrap 'N Stamp store (Canadian Shipping only) to support my blog. Thank you!

Linked to: 
SSS Wednesday Challenge - AG


Saturday, December 9, 2017

Bright Lights Blog Hop with Scrap 'N Stamp!

Hi friends! I'm really excited to be part of another awesome blog hop with the Scrap 'N Stamp team, and this month we are featuring the fantastic Lawn Fawn String Of Lights die set!! If you've come from Julia's Blog you're in the right place. If you want to start at the beginning, head over to see Tara at the Scrap 'N Stamp Blog. Wait till you see the amazing projects everyone creates with this lovely die set...


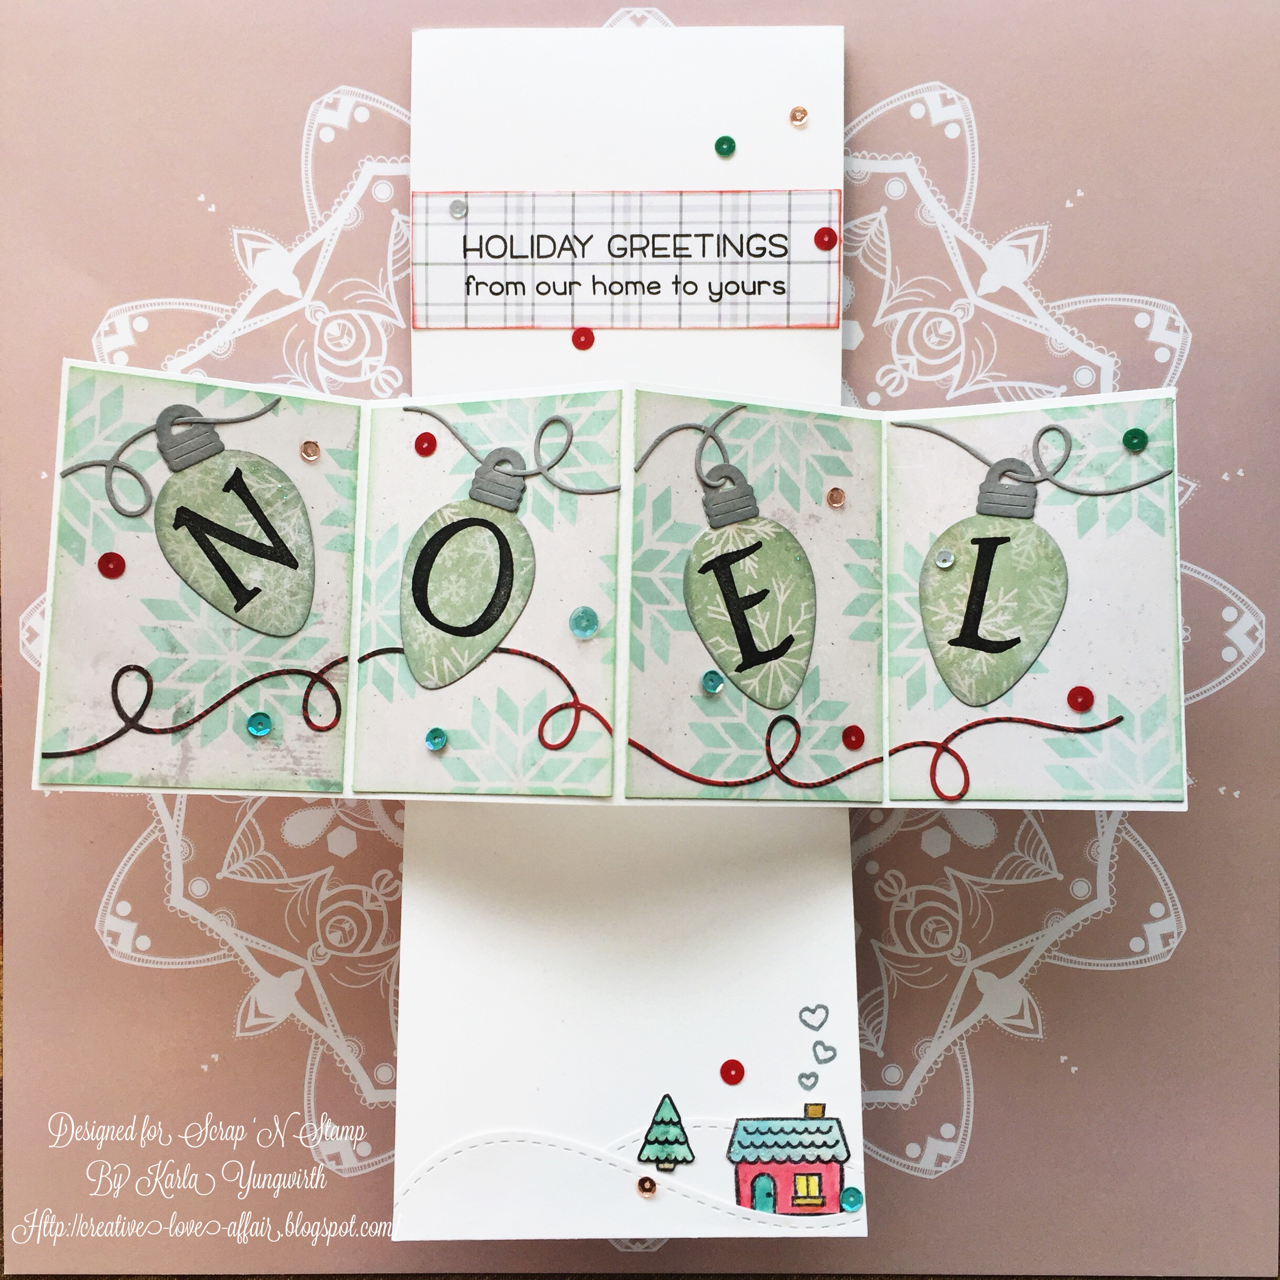
For my project today I've made a beautiful Christmas Twist & Pop card. I love how much fun you can have decorating this style of card! I used some Tim Holtz Christmas paper from his new 8x8 paper pad on the background of my card, as well as using two different patterns to diecut the little light bulbs from.

You get three different sizes of light bulbs in this set, which includes one that has the little highlight strip cut out and one that is a full bulb - so you can layer them or use them separate. You also get two different types of toppers in each size and the string, which is a lovely, twisty scroll. I decided to layer my bulbs and pop them up with foam dots between the layers. I added a bit of Glossy Accents on the highlight and some pretty SpiegelMom Scraps sequins. .

I used Distress Crayons to watercolour in images from the Lawn Fawn Winter Village stamp set and used some Stickles on the snowy areas of the the homes. The Your Next Stamp Double Stitched Hills dies created a snowy background for my little scene, and I used the string die again along the bottom as a loopy scroll.


Here's the Twist & Pop effect when the card opens! So cool! If you want to see directions on how to make this card you can check out the details on this video HERE I made for another card in the same style.


I used the pretty In The Making Cling NOEL stamp on top of the larger bulb diecut. This stamp is great as each letter is separate so there's no masking required. I used more of the Tim Holtz Christmas paper for the bulbs and background of the pop out section of the card. Along the bottom of the card I've layered another watercoloured house and snowy hill, leaving space to add my handwritten message.

On the top of the card I've added a stamped sentiment from the Winter Village stamp set along with a few more pretty sequins.


BLOG CANDY!!

Scrap'n Stamp is giving away a New Release Lawn Fawn Stamp Set for every stop on the blog hop! So make sure to take a moment to comment on all the designers' fabulous work. Winners will be announced and must email Scrap'n Stamp to claim their prize! GOOD LUCK! This prize is open internationally.


Here's the Blog Hop line up:

Tara Nixon Cox

Julia Chupik
Karla Yungwirth - You are here!
Nancy Frustaci
Amy Rysavy
Karen Warner
Amber Trubiak


Thanks so much for stopping by today! Be sure to head over to Nancy's Blog next to see her beautiful project - and you can check out the Lawn Fawn String Of Lights die set at the Scrap 'N Stamp store. Have an amazing, crafty weekend - and good luck on the giveaway!

*I've used affiliate links to the Scrap 'N Stamp store (Canadian Shipping only) to support my blog. Thank you!


Tuesday, November 14, 2017

Scrap ‘N Stamp - Distress To Impress Blog Hop!

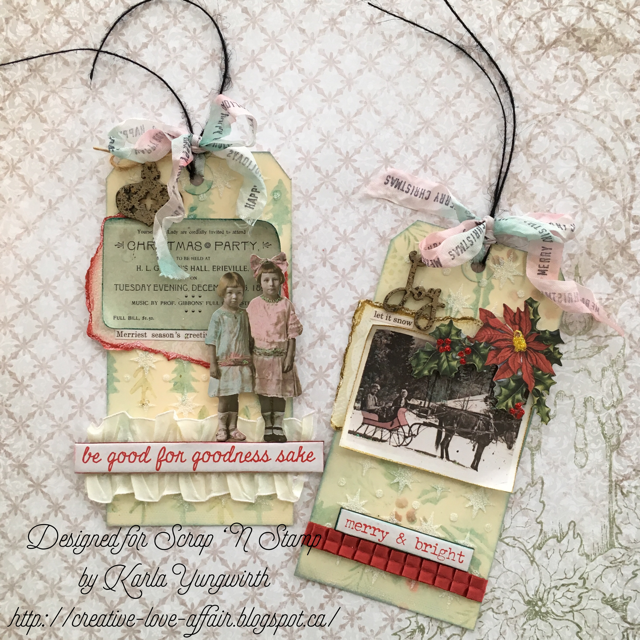
Hello! I hope you’ve been having a fantastic week so far! I’m so excited to be joining the Scrap ‘N Stamp blog hop today where we are sharing projects using the fabulous set of Tim Holtz Distress Crayons #9. I have to admit, I haven’t played around with Distress Crayons for quite some time, But I had so much fun once I pulled them out and started playing! They have some really cool properties, and one of my favourite ways to use them is as a watercolour medium, but I’ve tried several different techniques here today. I'm the last stop on the hop, and if you've arrived from Nancy's blog you're in the right place. If you want to start at the beginning, head over to see Tara at the Scrap 'N Stamp blog. Here's a look at the two tags I made today. I'm sure two special people are going to love seeing these on their Christmas gifts (if I can part with them 😉). Be sure to check out below how one lucky commenter from each blog will win their own set of crayons - even international peeps!


I started off by using two Tim Holtz stencils - the trees and the holly, and scribbled the Barn Door, Pine Needles and Brushed Corduroy Distress Crayons from the set onto my craft mat. I spritzed each colour with a little water and used a sponge tool to pick up the colours and stencil them on. It gave them a soft watercolour look, which I love! After the background was dry I used this star stencil to add a translucent texture paste over top and then added Soft Fallen Snow embossing powder from Emerald Creek Craft Supplies. I lightly heat embossed to add a lovely puffy texture and then added some Tumbled Glass and Weathered Wood Distress Ink around the edges for a bit of added shadowing.

Next I used the Distress Crayons to colour in the adorable little girls from the Tim Holtz paper dolls set and the sleigh from the Tim Holtz ephemera by scribbling again on the craft mat, but this time using a waterbrush to pick up the colour and add it to the areas I wanted. The crayons watercolour so beautifully, and really I can't wait to use them more for this! Next I used them around the edges of the chipboard sentiments and the party invite by rubbing them directly on the edges and then using my finger to smudge around to blend the colour slightly.

My last technique was to stamp seam binding ribbon with a couple Tim Holtz sentiment stamps using Archival Ink. Next, I scribbled the crayons onto the craft mat again, spritzed them with water, and lightly dipped each section into the colours. I crinkled up the ribbon and let it dry to give it a cool, crumpled look.

I glued all my elements down, adding a Kaisercraft wood veneer embossed with Emerald Creek Charred Gold, a pretty pointsettia embellished with Stickles and a lovely red ribbon along the bottom. You can see I even used the Brushed Corduroy to edge the torn paper behind my photo - I love this effect!


 On the second tag I embossed another wood veneer embellishement and layered on these adorable girls, ready for their party, using foam dots to give them some dimension above the ribbon and chipboard.


 BLOG CANDY!!
Scrap'n Stamp is giving away a set of Distress Crayons for every stop on the blog hop! So make sure to take a moment and comment on on all the designers' fabulous work by November 21st. Winners will be announced November 24th and must email Scrap'n Stamp to claim their prize! GOOD LUCK! This prize is open internationally.

** Also all the Distress Crayons are on SALE (Canadian Shipping only) for 25% for the rest of this month!!

Here's the Blog Hop line up:

Tara Nixon Cox

Amber Trubiak

Amy Rysavy

Julia Chupik

Karen Warner

Nancy Frustaci

Karla Yungwirth - You are here!

Thanks so much for stopping by! I hope all these Distress Crayon projects have given you lots of inspiration to grab some of your own and get started on all the cool ways you can use them! Have a super awesome week, and don't forget to comment for a chance to win!


Friday, October 13, 2017

Scrap 'N Stamp Freaky Friday Blog Hop!

Hello! I'm so excited to be part of the Scrap 'N Stamp Freaky Friday Blog Hop featuring the Tim Holtz Ancestors Paper Dolls!! All the talented ladies on the hop are working with this fantastic paper doll ephemera pack - and you won't believe all the wonderful and different ways we've all come up with to use them! If you've arrived here from Tara at the Scrap 'N Stamp blog, you're in the right place.
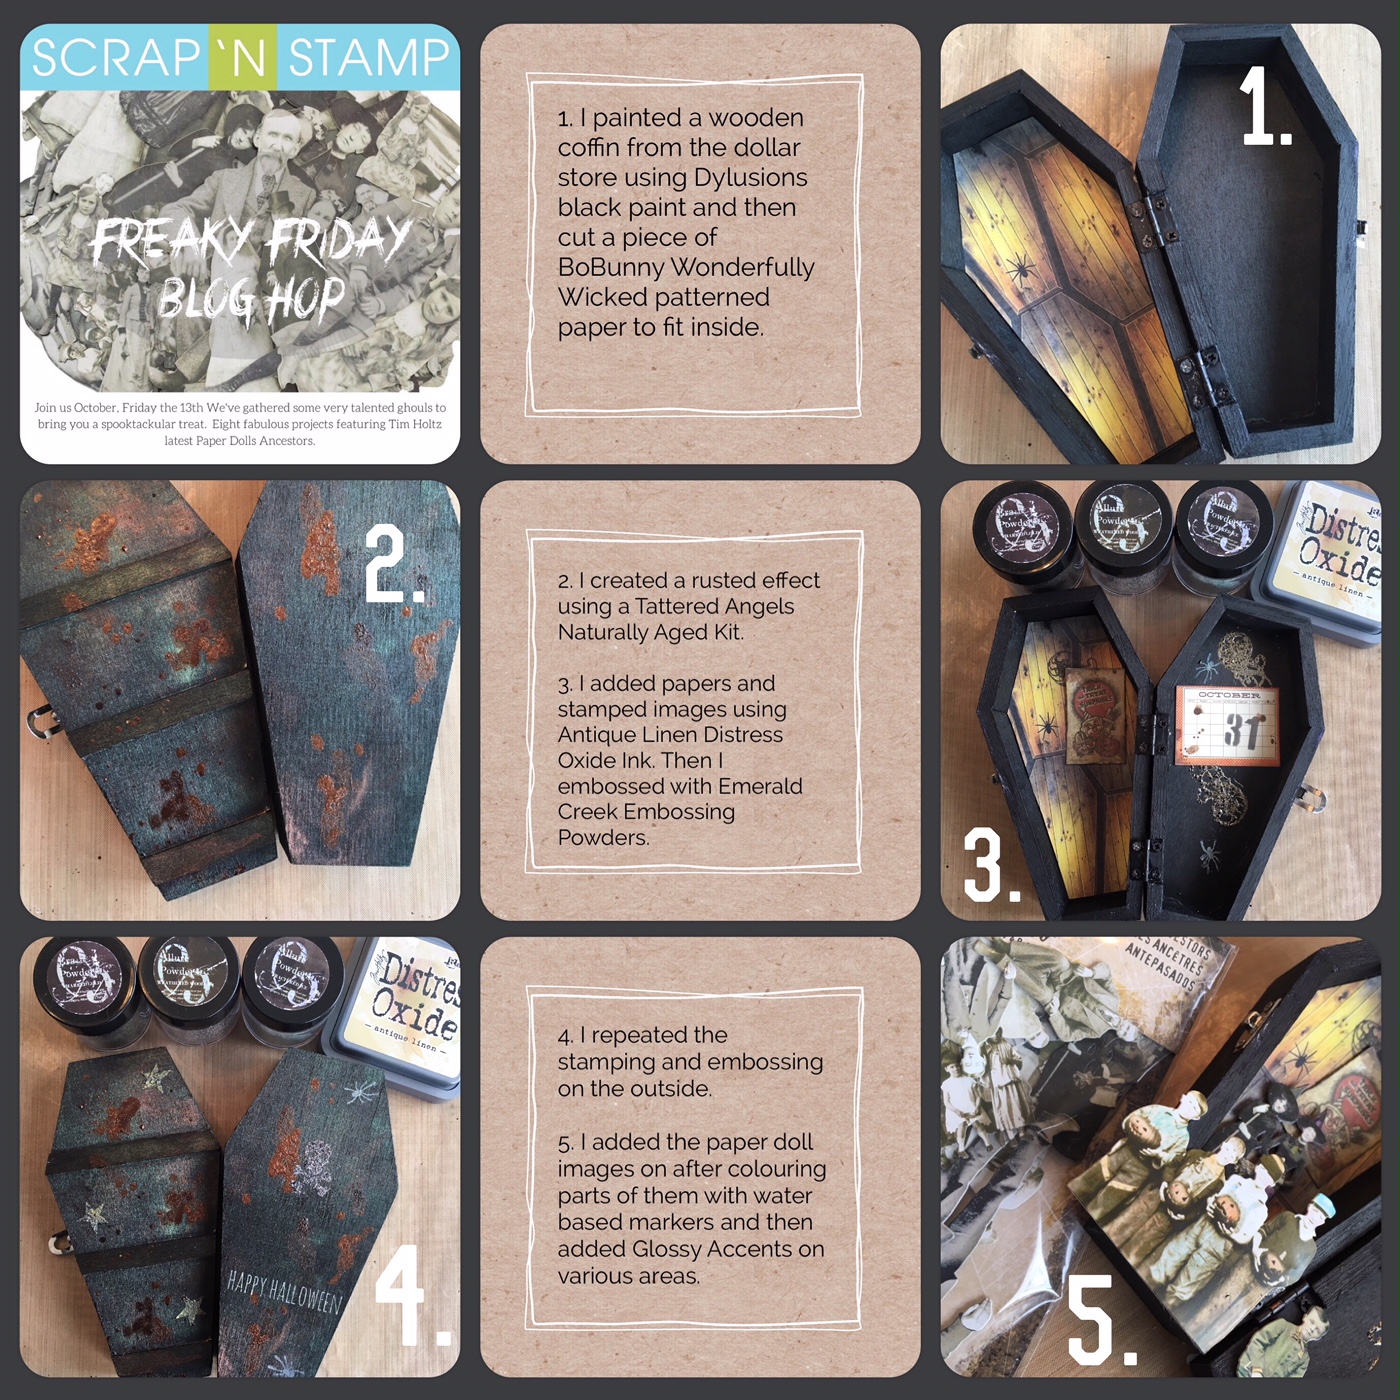
Seeing as it's getting close to Halloween I simply had to make something a little spooky, but these are definitely not just for Halloween! There are so many neat images that would work perfectly on any project, for any occasion.  For my project today I've created this cool mixed media coffin. I thought this diecut of the children in their halloween costumes was perfect for the front of this project! I've included a short tutorial below showing you the steps I used to create it. I love all the inky details 🖤🕷🕸🖤

Inside, we've got several layers of these little guys - I love the way some of the figures in the pack are sitting so I could perch the boy on top of the calendar! One of the great things is you get so many pieces in the Ancestor pack, in so many different sizes - so don't be scared to use them!

I've got a quick little tutorial on the steps I used to create this project:

 And here's a look at all the spooky details! 

Supplies used:
Coffin - Dollar Store
Black Paint - Dylusions
Mists & Naturally Aged Weathered Bronze Kit - Tattered Angels
Embossing Powder & Stones - Emerald Creek
Papers & Stickers - BoBunny Wonderfully Wicked, Tim Holtz, Jillibean Soup
Ink - Antique Linen Distress Oxide Ink, Versamark
Asst sequins, wood veneer, stamps, ribbon

BLOG CANDY!!
Who says Friday the 13th is bad luck - Here's your chance to win! Scrap'n Stamp is giving away a $25 coupon for every stop on the blog hop! So make sure to take a moment and comment on on all the designers' fabulous work. Winners will be announced Oct 20th and must email Scrap'n Stamp to claim their prize! GOOD LUCK!

Here's the Blog Hop line up:

Tara Nixon Cox
http://www.scrapnstamp.ca/blog/

Karla Yungwirth
http://creative-love-affair.blogspot.ca/ You are here!

Amber Trubiak
http://foreverambersart.blogspot.ca/

Karen Warner
http://KWarnerStudio.com

Nicole Wright
http://canadiannickelscrapn.blogspot.com

Nancy Frustaci
http://www.nancygracecreations.com/blog

Niki Stone
http://polishedstonedesign.blogspot.ca/

Julia Chupik
http://paradiselostyyc.blogspot.com/

For all my Canadian friends, you can check out the shopping deals available right now at Scrap 'N Stamp, since they ship within Canada. And for all my international friends - you get to check out all the fantastic Freaky Friday inspiration!

Thanks so much for stopping by! Be sure to head over to Amber's blog next to see the amazing project she's come up with, and don't forget to leave a comment for your chance to win a $25 gift certificate!

Linked to:
DL Art - Thankful Thursday October Linky Challenge
CNHC Patterned Paper - October Link Up
Word Art Wednesday - #304-305 AG
FFC #209 - AG
SSS Monday Challenge - Not A Card
Emerald Creek Dares - Freaky & Fun


Friday, September 8, 2017

Scrap 'N Stamp - Stamptember Blog Hop!

Hello friends!! I'm back today with a fun blog hop as a Guest Designer with my friends at Scrap 'N Stamp! If you've arrived here from Tara at the Scrap 'N Stamp blog, you're in the right place as she's at the start of the hop. We are all sharing projects today using the amazing Memory Box Postage Stamp Die, which is on SALE right now for 25% off!!

I was really impressed with how nicely this die was able to cut through my cardstock. And, I loved that it not only cuts 5 individual stamps, but also has a border die included that I used around the edges of my larger background layer. I added some Prima postage patterned paper from my stash and used a ribbon and one of the awesome vintage light bulb charms from the Maya Road - Ken Oliver Vintage Bulbs and Keys embellishments.


I decided to use the Lawn Fawn Love Letters stamps set and stamp directly onto the Recollections Watercolour patterned paper I was using. I used some Prismacolor coloured pencils to colour in the images and added a couple of adorable envelopes.

Inside and on the envelope, I added another diecut postage stamp - I'm thinking these would be adorable on some DIY handmade tags tucked in and stamped on.... 💕And, I added another envelope and some more SpiegelMom Scraps sequins to coordinate with the front of the card.

I really enjoyed making this cute card, which I gave to a wonderful friend in a package of Happy Mail goodies - so really it was the perfectly coordinated card!

Here's the blog hop line-up:


Karla Yungwirth - That's me!

Thanks so much for stopping by! (I've included some affiliate links in this post to help support my blog xo) Be sure to head over to Amber's blog next to see the awesome project she's created!! And don't forget to visit to the Scrap 'N Stamp online shop to check out all the wonderful crafty supplies - and the beautiful Memory Box Postage Stamp Die! Scrap 'N Stamp is a Canadian store that ships within Canada, but if you're international you'll still be able to check out all the crafty inspiration we've got for you today 😉Wishing you a fabulous, crafty weekend ahead!

Linked to:
DL Art - Thankful Thursday Sept Challenge
SSS Wednesday Challenge - Stamp It (Wild Whisper circle stamp used with Distress Oxide Ink)
CNHC Patterned Paper - September Link Up