Showing posts with label Distress Oxide Ink. Show all posts

Thursday, October 14, 2021

Wild Whisper Hello Friend Slimline Card!

 Hello friends! I'm over on the Wild Whisper Blog today sharing a pretty slimline card, perfect to send to a special friend! I love that I can create whatever sentiments I want using the Brush Script Stamp! So many possibilities! I diecut the slimline frame using the Mama Elephant Slimline Fancy Fence Diecut and Nicole Wright's beautiful Ledger and Script paper, adding a stencilled panel and stamped sentiment. Now I have a beautiful card ready to send to make someone smile!


Thanks so much for stopping by! Be sure to check out the Wild Whisper Blog for all the details and closeups and use the code DTKARLA at the Wild Whisper Shop to save 10%! Have an amazing and creative day friends!! 


 Supplies:
Nicole Wright Ledger & Script paper and stamps
Sweet Little One Rainbow Stencil

Thursday, June 24, 2021

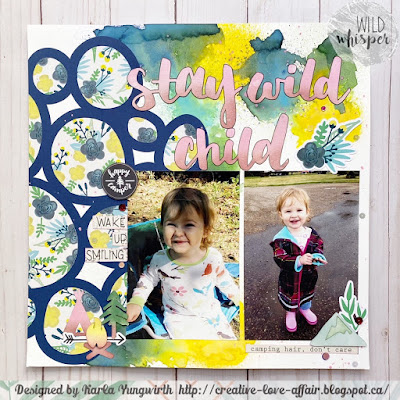
Wild Whisper Wild Child Layout with Cut Files!

 Hello friends! I'm back today with a bright summertime layout over on the Wild Whisper Blog! I had so much fun using the fabulous Lake Life Cut File Bundle and the pretty Lake Life Paper Pack! I love being able to use cutfiles to embellish my layouts and especially for titles. They were easy to upload and cut with my Cricut Maker. I also cut the circle elements on the left with a file from Design Space and inlaid the Lake Life paper, inspired by the Creative Scrapbooker Magazine June Sketch


You may also want to check out the Life Life Card Pack!! as well as the large selection of Cut Files available!!


Thanks so much for stopping by! Be sure to use the code DTKARLA at the Wild Whisper Shop to save 10% and have an amazing and creative day!!


Thursday, February 18, 2021

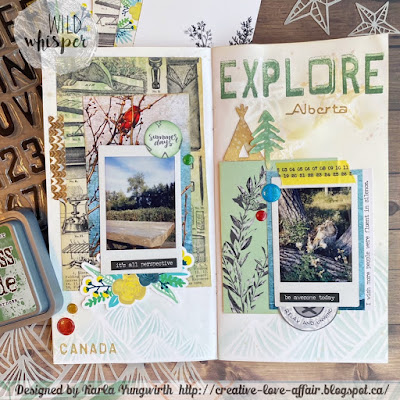
Wild Whisper Explore Alberta Travelers Notebook!

 Howdy friends! I'm over on the Wild Whisper Blog today with a pretty mixed media Travelers Notebook Spread using some amazing, as always, Wild Whisper products! These photos were from a Wild Whisper Hike I took my daughter on in 2018 and we all met at Fish Creek Park in Calgary, Alberta. It was so great to meet up with and craft with Suzy and Heather and all the other ladies who joined in!


Thanks so much for stopping by! Be sure to check out the Wild Whisper Blog for details and closeups and don't forget to use the code DTKARLA to save 10% off in the Wild Whisper Shop! Have an amazing weekend friends! 


Friday, November 27, 2020

Wild Whisper Gardening Journal!

 Hello! I'm over on the Wild Whisper Blog today with a continuation of my Gardening Journal Travelers Notebook! If you haven't seen the pretty handmade journal and video check that out HERE. Today, I'm sharing the next page spread with some photos of our plants we lovingly cared for all summer!!


Supplies:

PS Don't forget to check out the fabulous Black Friday Sale for special deals!!


*Be sure to use the code DTKARLA to save 10% in the Wild Whisper Shop

Thanks so much for stopping by! Be sure to check out all the closeups and details on the Wild Whisper Blog, and have an amazing, crafty weekend!!


Friday, October 2, 2020

DIY Travelers Notebook Book Journal with Wild Whisper Designs!

 Hello friends! I'm back today to show you a project I'm sharing on the Wild Whisper Designs Blog. I recently did a Facebook Live Video for Scrap Shotz, showing how to make a DIY travelers notebook with Wild Whisper products and the We R Memory Keepers book binding tool. I decided to create a book journal for my daughter who loves to read, and I know she'll love to fill this with all the books she's reading and keep little notes on each one! It was so easy, I may just have to make one customized for all my family and friends!


Here's a look at the first page I did, and you can see the rest on the Wild Whisper Designs Blog!

Here's a look at the video showing you lots of NEW Wild Whisper goodies and the exact dimensions to cut your paper to create the journal!


Thanks so much for stopping by! Be sure to check out the Wild Whisper Designs Blog for closeups & details of each page and a list of products I used from the Wild Whisper Designs Shop. Don't forget, you can save 10% off at the WW Store with the code DTKARLA, so happy shopping!! 


Linked to:
SSS Monday Challenge - Add A Photo!

Thursday, February 13, 2020

Layering Scrapbook Elements with Doodlebug Design & Video!

Hello! I'm back today with another fun double page layout on the Scrap Shotz Blog using the Doodlebug Design Winter Wonderland collection! This time I'm sharing a video giving you some tips to use to layer all those fun papers, stickers, diecuts and embellishments you have - as well as how to use the Marvy Snow Marker!


Here's a look at the first layout using some cut apart 2.5" and 3x4" cards and border strips. I absolutely love the colours in this collection!


I added in some mixed media with Distress Oxide Sprays in the second layout - and this is the one you'll see me create in the video below.


Here's a look at the VIDEO where you can see just how everything came together-


Thanks so much for stopping by! Be sure to head over to the Scrap Shotz Blog for closeups, details and links, and have an amazing weekend coming up!!


Linked to:
SSS Wednesday Challenge - 2 or more patterned papers

Friday, October 25, 2019

Creepy Caravan Blog Hop!

Well hello friends! I'm super excited because it's Day 12 of the 13 Days Of Halloween Series... and the Creepy Caravan Blog Hop!!


You'll find 12 amazing, spooky projects on this hop - perfect to inspire you to get in Halloween mood!! Here's the hop line up:

It's Oddly Appealing
Whimsy Chic Papercrafts
Kelly Parker Designs
Scrap Savvy Creations - Cassandra
Life in a Snapshot
Karla Yungwirth Designs That's ME!
Scrapstorian- Brande Davison NEXT
Stephanie Eaton
Roni Johnson  a.k.a. Ink Stained
Matter of Crafts/Jessica Larios
Jennifer Gagne (KaezMum)
Nelly's Artistic Creations

For my project I'm sharing a perfectly creepy haunted house! Be sure to scroll down to catch the video to see how this came together 👻 as well as some fun BLOG CANDY!


Tim Holtz Ephemera, Distress Stains, Crayons, Oxides and Oxide Sprays worked awesomely together to add to this dollar store wooden house, taking it from boring to spooky in no time!


I dug into my Halloween stash to find whatever worked! This Simple Stories pumpkin sticker was just the right size for one of these girls to hold. I coloured their outfits with Distress Crayons and I love the vintage look. 


Stickles added in different areas give a sparkly effect - I firmly believe every event needs sparkle!


Emerald Creek Craft Supplies Embossing Powders add neat touches to stamped images as well as random areas that just need a touch of blood. I love how my new Studio Katia pumpkin border stamp fits on the sides of the house. 


Here's a look at the video where you can see all the fun supplies I used and just how it came together-


BLOG CANDY!!
I'm giving away a $10 gift certificate to the Studio Katia store to one lucky person who leaves a comment below! Leave your comment by October 28th and I will announce the winner on October 29th. I've used several Studio Katia products in my project today, including the Autumn Borders stamp, Square Brick Stencil, Silver Foil Star Sequins and Spooky Satin Confetti!
Next up is the awesome Scrapstorian- Brande Davison

Thanks so much for stopping by today! I hope you have a fantastic weekend ahead with lots of creatively creepy crafting ideas!


Linked to:
SSS Monday Challenge - Spooky
SSS Wednesday Challenge - Fall Colours

Friday, October 18, 2019

13 Days Of Halloween - Day 10 - Halloween Hand Me Down Layout!

Hello! I’m back today to share a sweet layout for the 13 Days Of Halloween series on YouTube that I’m having so much fun with! Today I’m using some photos of my youngest daughter wearing a hand me down costume that both her sister and her older cousin wore. I love that this costume got so much use!


You can check out the video here to see just how I put it together! Don't forget to subscribe and hit that notification bell in YouTube so you don't miss any of this fun series.


Thanks so much for stopping by! Be sure to head over to the Wild Whisper Blog for details and closeups, and don't forget to use the the code DTKARLA to save 10% in the Wild Whisper Shop! I hope you all have a fantastic weekend.


Linked to:
SSS Wednesday Challenge - Halloween

Wednesday, October 9, 2019

Fright Night Home Decor Tag!

Hello! Well, October is sneaking by, but I feel like I am not going to miss Halloween this year 😜 as I've had lots of fun creating spooky projects! I'm so excited to show you this one that I'm featuring over on the Southern Ridge Trading Company blog today using the Large Chipboard Tag (coming soon!), Frogs, Spooky Halloween Word Mix and Halloween Mix 2 chipboard embellishments and the 3x3 Star Stencil and Under The Sea Bubbles Stencil from the Southern Ridge Trading Company Store. 


Be sure to head over to the Southern Ridge Trading Company blog to get the steps to create this huge Halloween Tag as well as see closeups and a full supply list! Thanks so much for stopping by, and have an awesome week friends!


Linked to:
SSS Monday Challenge - Fall/Autumn

Tuesday, October 8, 2019

13 Days Of Halloween - Day 7 - Foiled Cricut Tags!

Hello! Well, I must admit it doesn't feel much like Halloween anymore - we just got another snowstorm and it feels more like Christmas! Hopefully it will be much nicer when October 31st comes around though. We always have to take into account whether the girls will have to wear winter gear under their costumes, and I think this year's outfits will be perfect for that! (scroll down to see what they'll be wearing) Today, for the 13 Days Of Halloween Series on YouTube I made some fun Halloween Tags with my Cricut Maker and used the We R Memory Keepers Foil Quill to add a foiled sentiment to the back. 


I used both gold foil and the Foil Quill along with a silver Cricut gel pen to add my sentiment to the back side of the tags. I chose to colour in one with gel pen and leave the other as an outline.


Distress Oxide Inks add some shading and highlights to the cardstock edges. The Tim Holtz Chit Chat Occasions stickers add spooky wishes to the front.


I decorated the front of the tags with Studio Katia and Buttons Galore and More sequins and gems for a bit of bling, and then added a coordinating piece of baker's twine.


I even spritzed the pumpkin and owl with sparkly Dylusions Mica Sprays for some extra Halloween shine!


Here's a look at the video where you can check out exactly how I made these cute tags!


I let my girls do the decorating this year and this is how our mantel looks. I think they did a great job! How many projects can you spot from previous years?!! 


And here's a look at the costumes they chose this year. I'm not sure if we were hungry when we went shopping or what, lol... These will work at a Halloween Party inside or over winter jackets outdoors, so that's a win-win!


Thanks so much for stopping by! You can find these Foiled Halloween Tags in Cricut Design Space if you'd like to make them yourself. Be sure to check out Day 7 of the 13 Days Of Halloween, and have a wonderful week!


Tuesday, September 24, 2019

13 Days Of Halloween - Day 3 - Cute Ghost Card!

Hello! Well, it's Day 3 of the 13 Days Of Halloween Series over on YouTube. Today, I'm sharing this super cute puppy card using Gerda Steiner Designs Dog Dressed As Ghost digital stamp along with some fun colouring techniques and even a little mixed media fun!


Here's a look at the video where you can see exactly how I put this cute card together. Be sure to follow me on YouTube and hit that notification bell 🔔 so you don't miss any videos in the series!


Thanks so much for stopping by! You can see closeups and details of this spooky Halloween card on the Gerda Steiner Designs Blog, and you might even want to check out the GSD Shop  for even more crafty inspiration! Hope you have an amazing week friends. 👻


Monday, September 23, 2019

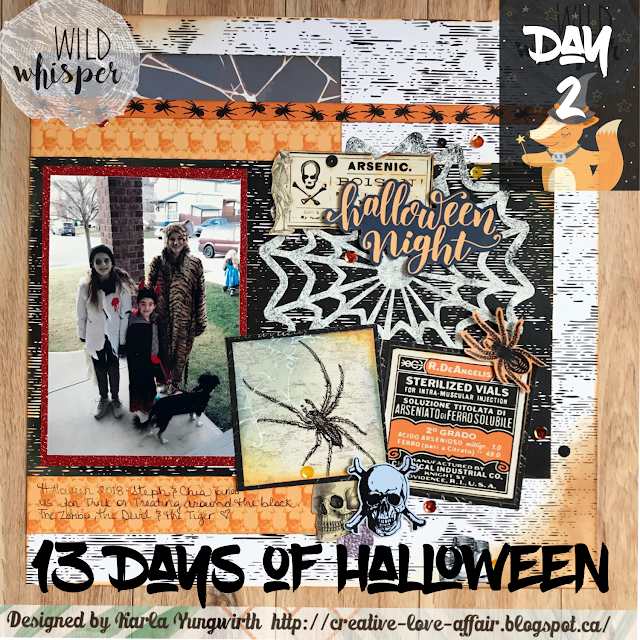
13 Days Of Halloween - Day 2 - Wild Whisper Halloween Layout!

Hello hello! Well, it was a wildly busy weekend, so I'm just finally getting Day 2 of the 13 Days Of Halloween posted... Every year the Creative Scrapbooker Magazine crew hosts a fantastic Scrapbook Carnival for 2 days full of fun, which just happened to be this past Friday and Saturday. People come to crop and shop. I had so much fun helping out the Scrap Shotz booth, doing several make 'n takes & demos, and even doing a demo in the Wild Whisper booth! I even got to chat with Karen from Southern Ridge Trading Company, whose Design Team I'm also on. She is so sweet and it was so great to get a bit of time to actually talk face to face. I'm so blessed to be able to work with so many amazing local companies. Kim Evans from Emerald Creek Craft Supplies was also there and I got to see her in action demoing her new Rock Candy Embossing Powders! All in all it was super busy, but awesome, and so rewarding being able to teach people some new things, meet up again with old friends, and make new friends. So, I'm just catching up and getting a few things posted now! This year I'm doing a Halloween Series - The 13 Days Of Halloween on YouTube and you can find me there every Tuesday and Thursday leading up to Halloween with a fun spooky project! Of course I'll be sharing here too, but if you want to see all the action on the day it's up, be sure to check it out there first. For Day 2 I decided to create a layout using the brand new Halloween Night collection and Wispy Wool Embossing Powder from Wild Whisper and a photo of my three beautifully scary girls from last Halloween 👻 They are already trying to decide what costumes to pick out for this year!


Here's a look at the video where you can see how I put this creepy layout together using the SCT365 2019 Layout Sketch for September!


Thanks so much for stopping by! You can find closeups of this layout on the Wild Whisper Designs Blog - and don't forget to use the code DTKARLA to save 10% on your purchases at the Wild Whisper Shop!! Be sure to follow me on YouTube and hit that notification bell so you don’t miss any of the 13 Days Of Halloween projects! 🎃 Have a fantastic week my friends!


Monday, September 2, 2019

The Good Stuff Fall Layout with Video!

Hey there! Well, since it's September I thought I'd jump right into fall with a pretty autumn layout that I'm sharing on the Southern Ridge Trading Company Blog! I love customizing all the gorgeous chipboard and today I'm using Fall Leaves and Abstract Frame Set chipboard pieces along with the medium Fence Stencil from the SRTC Shop and using Distress Oxide Inks to pull everything together. I based this layout on the August Sketch in the SCT 365 - 2019 Layout Class and added some pretty SpiegelMom Scraps Sequins (use code KARLA15 to save 15% off at the SMS Shop!)


Here's a look at the video where I am sharing my process for colouring the chipboard and customizing this layout. I would love for you to like and subscribe in YouTube  💘


Thanks so much for stopping by! Be sure to head over to the Southern Ridge Trading Company Blog for a full supply list, details and closeups. Have an awesome week my friends!!

Linked to:


Saturday, August 24, 2019

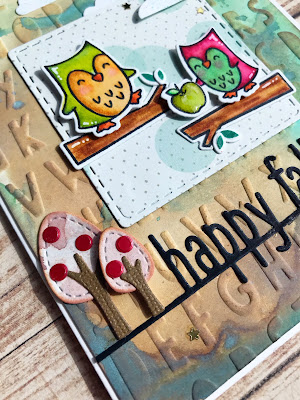
Happy Fall Owl Teacher Card!

Hello friends! I can't believe how quickly August is flying by! It's all too easy for bedtimes to be pushed a bit later and the girls seem to adjust to sleeping in all to quickly. With back to school coming September 2nd, I'm feeling the need to try to get back to a bit of a routine while still enjoying the warm weather and lazy days. We spent the last few days doing lots of organizing - I know when I get that feeling I need to grab a hold of it since I'll run out of steam or time soon enough. The funny thing about organizing is it's addictive! Pretty soon the girls are cleaning their rooms and Mike's cleaning the garage... and then we are all left feeling great about our accomplishments. Now, don't get me wrong, there are still plenty of spaces left to purge, clean and organize, but for right now there's a few very tidy areas that have me smiling every time I walk by them. When I'm feeling the need for a little break I just grab a few crafty supplies and colour up some cute images, which today turned into a very sweet teacher card ready to tuck into a new backpack for the first day back to school.


I started off with a Distress Oxide Inked background from a piece of paper I was playing with a few days ago. I used my craft mat to squish the inks on my mat, spritzed them with water and dipped my paper in, drying in between dips until I had an effect I liked. I had a CTMH alphabet embossed folder which I used to emboss the background and then sponged on some brown Oxide Ink to highlight the raised areas. 


The cute owls from the Lawn Fawn So Owlsome Set are coloured on Bristol Cardstock with Zig Clean Color Real Brush Markers. I used some white gel pen to add highlights and added Glossy Accents to the green apple. I used a Happy Fall Line Border diecut sentiment that was included in one of the SCT Sampler Packs and added trees and a small cloud from the Lawn Fawn Center Window Picture Card Die and Add On sets along with Studio Katia Clouds cut from some pre-inked papers in my stash. The larger apple is from the CTMH School Kids Stamp Set. 


Inside, I used a 'hello' sentiment from Hello Bluebird Just Sayin', 'teacher' from Studio Katia Kobi Loves School, and you're owlsome' from the Lawn Fawn So Owlsome set. I love how well these all worked together!


I had fun pulling out all my teacher/back to school stamps and crafty goodies to create a cute card. Just by having a few different sets in front of me at a time I was able to combine them and their sentiments for a lot more options. Thanks so much for stopping by today! I hope you have a wonderful, crafty weekend!


Thursday, June 13, 2019

Your Next Stamp New Release Blog Hop!

Well hello again friends! I'm so super excited to be Guest Designing for the fantastic Your Next Stamp this month, and I can't wait to show you what I've created with their fun new stamp and die set Cool Tees for the New Release Blog Hop! If you missed the Sneak Peek Post with the adorable Card Buddies you can find that HERE. The Cool Tees stamp set is so fun with a T-shirt stamp and tons of sentiments and images you can add to it. My 12 year old daughter, Amie, actually had the idea to create a Tie-Dye T-shirt, so I pulled out my Ken Oliver Color Burst powders to get started. I had actually met Ken and taken a class over the weekend, which was fantastic, so I was all ready to get inky. There are so many great images in this stamp set that I just couldn't stop at one though!


Be sure to scroll all the way down for a discount code, a link to all the designers in the hop - and of course Blog Candy!


I started off by sprinkling Color Burst powders on a piece of Bristol Cardstock and let my 7 year old, Erica, spritz it with water. She thought it was super cool the way the colours created a magical background. Then, I took the Cool Tees T-shirt stamp and stamped it on the various areas of the background. I stamped with Gina K Amalgam Black Ink - my fav right now - and then diecut the T's out with the coordinating die.


I thought I'd do some Distress Oxide Ink Blending on each background behind the T-shirts to add colour and keep with the Tie-Dye look. Here, I used Blueprint Sketch, Festive Berries and Spiced Marmelade on 110 lb white cardstock and then spritzed with water to create this awesome effect.


I coloured in each of the cute images with Copic Markers and popped them up with foam tape. A bit of Glossy Accents and white gel pen add detail. I stamped the sentiments directly onto each T-shirt. I love how versatile this set is - perfect for so many occasions.


This Distress Oxide Ink combo is Lucky Clover, Twisted Citron and Spiced Marmalade.

I cut up a 12x12 piece of Echo Park Best Summer Ever paper to used as the base of my card. A bit of Black Soot Distress Oxide Ink edges it nicely. This Thumbs Up card could be great for a congrats or graduation card!


The Distress Oxide Ink combo for this card is Twisted Citron, Peacock Feathers and Salty Ocean.


This cute coffee cup makes me laugh - and there's an equally cute Monday Coffee Cup in the set 😉 I stamped some star stamps from the set on the T-shirt and added some shiny sequins for just a little more bling!


This Distress Oxide Ink combo is Wild Honey, Picked Raspberry and Peacock Feathers.


Lastly, I made a T-shirt tag using the cute frog and the YNS Cool Tag Four diecut inked with Festive Berries, Tumbled Glass and Evergreen Bough Distress Oxide Ink. This will make a perfect teacher gift for one of the amazing teachers at my girls' school - all wrapped up and ready to go!


Now, of course we have an awesome discount code for you to save on all the goodies in the YNS Shop!

Here's a link to find everyone in the hop! BLOG CANDY - $25 Your Next Stamp Gift Certificate!! You are not required to comment on each blog, but the more you do, the greater your chances of winning are!

You are invited to the Inlinkz link party!
Click here to enter
Thanks so much for stopping by today! I hope you have fun on the hop and find lots of inspiration along the way. Be sure to check out Your Next Stamp to see all the New Release goodies in the shop, leave a comment for your chance to win, and have a fabulous day 💝