Showing posts with label Distress Stain. Show all posts

Friday, October 25, 2019

Creepy Caravan Blog Hop!

Well hello friends! I'm super excited because it's Day 12 of the 13 Days Of Halloween Series... and the Creepy Caravan Blog Hop!!


You'll find 12 amazing, spooky projects on this hop - perfect to inspire you to get in Halloween mood!! Here's the hop line up:

It's Oddly Appealing
Whimsy Chic Papercrafts
Kelly Parker Designs
Scrap Savvy Creations - Cassandra
Life in a Snapshot
Karla Yungwirth Designs That's ME!
Scrapstorian- Brande Davison NEXT
Stephanie Eaton
Roni Johnson  a.k.a. Ink Stained
Matter of Crafts/Jessica Larios
Jennifer Gagne (KaezMum)
Nelly's Artistic Creations

For my project I'm sharing a perfectly creepy haunted house! Be sure to scroll down to catch the video to see how this came together 👻 as well as some fun BLOG CANDY!


Tim Holtz Ephemera, Distress Stains, Crayons, Oxides and Oxide Sprays worked awesomely together to add to this dollar store wooden house, taking it from boring to spooky in no time!


I dug into my Halloween stash to find whatever worked! This Simple Stories pumpkin sticker was just the right size for one of these girls to hold. I coloured their outfits with Distress Crayons and I love the vintage look. 


Stickles added in different areas give a sparkly effect - I firmly believe every event needs sparkle!


Emerald Creek Craft Supplies Embossing Powders add neat touches to stamped images as well as random areas that just need a touch of blood. I love how my new Studio Katia pumpkin border stamp fits on the sides of the house. 


Here's a look at the video where you can see all the fun supplies I used and just how it came together-


BLOG CANDY!!
I'm giving away a $10 gift certificate to the Studio Katia store to one lucky person who leaves a comment below! Leave your comment by October 28th and I will announce the winner on October 29th. I've used several Studio Katia products in my project today, including the Autumn Borders stamp, Square Brick Stencil, Silver Foil Star Sequins and Spooky Satin Confetti!
Next up is the awesome Scrapstorian- Brande Davison

Thanks so much for stopping by today! I hope you have a fantastic weekend ahead with lots of creatively creepy crafting ideas!


Linked to:
SSS Monday Challenge - Spooky
SSS Wednesday Challenge - Fall Colours

Friday, July 5, 2019

Strong & Free Traveler's Notebook with Video!

Hello again friends! I have had a busy week this week!! We had a wonderful Canada Day earlier this week, celebrating downtown at some local City activities and the kids have been loving their first full week of summer holidays! Today, I'm over on the Wild Whisper Designs Blog with a Canada Day traveler's notebook with photos from last summer. I'm using an older collection from Wild Whisper - Strong & Free along with some fun supplies from Emerald Creek Craft Supplies.


Here's a look at the video where you can see just how I created this and all the fun supplies I used:


Thanks so much for stopping by! Be sure to head over to the Wild Whisper Designs Blog to see closeups and get all the details, and don't forget to use the code DTKARLA to save 10% off your purchases Wild Whisper Shop. You can find all the lovely Emerald Creek Craft Supplies here. Have a wonderful weekend my friends!


Monday, June 3, 2019

Vintage Father's Day Frame!

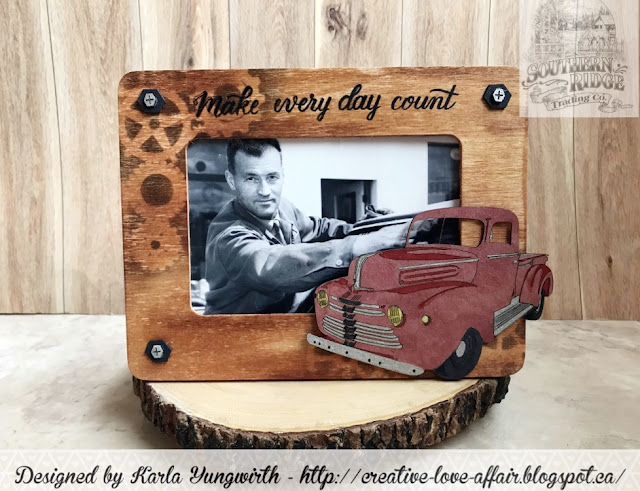
Hello! I sure hope you've all had a fabulous weekend! We had warm weather and sunshine here, and even a little crafting - all in all a wonderful and relaxing couple days. Today, I'm over on the Southern Ridge Trading Company Blog to share a Father's Day project I whipped up for my hubby. His grandpa was such an amazing man, and we recently came across this cool photo of him many years ago. He used to be a mechanic, so when I saw the Southern Ridge Trading Company Vintage Truck and Nuts and Bolts Chipboard along with the Medium size Multi Gear Stencil in the shop I knew just what I wanted to make. I have the full tutorial over on the SRTC Blog. I just love how it turned out, and I know hubby is going to love it too.


Thanks so much for stopping by! Be sure to head over to the Southern Ridge Trading Company Blog to get a full list of supplies, closeups and details. And, of course, have an awesome week!

Linked to:
SSS Wednesday Challenge - AG


Tuesday, February 14, 2017

All You Need Is Love and Coffee!

Hi friends! Happy Valentines Day! I really think that sentiment sums it up ;) One of my fav things my hubby does is the awesome lattes he makes on the weekends. I don't think I could live without coffee some days! So here is the Valentines card I created for him. These Coffee Faces and Coffee Sentiments clear stamps from Pretty Cute Stamps are a couple of my favourites, and I love how many different sentiments for so many occasions are included!

I started off with a piece of resist kraft printed background paper from a Tim Holtz paper pad. I used my pinks, reds and tea dye Distress Stains to colour the paper that I first had sponged with Picket Fence Distress Ink (to give it a lighter base). I love how the resist pops through!

Then, I layered on a square journaling card and added some CMTH coffee stain stamps. I used the coordinating SVG files from Pretty Cute Stamps to first cut out the images with one of my favourite tools - my Cricut Explore, and then I was able to easily stamp the images before colouring with Prismacolor and Hobby Colour Markers. I added the sweet faces on after, heat embossing the white one.

I added a couple diecut hearts and sequins from SpiegelMom Scraps and popped up the coffee press. These neat beans on the bottom of the card are included in the PCS coffee set.

Inside, I added some extra coffee stain stamps and the I Love You A Latte sentiment from the PCS Coffee Sentiments set. The Happy Valentines Day stamp is from the Tim Holtz Crazy Talk set, and I decorated the envelope to match.

Mike was very happy to get open his card this morning, and of course he got some chocolate to go along with it! We always do a little something special with the girls and they loved opening some handmade cards, chocolate and little stuffed animals. I was very lucky to get beautiful white roses, a lovely card and some yummy candy! I think making someone feel special, whether its for Valentines or any day, is something they will carry with them for a long time.

Thanks for stopping by today! I hope you have a day filled with love, and of course a little craftiness!

Linked to:
DL Art - February Linky Challenge
Crafty Hazelnuts Patterned Paper - February Challenge
SSS Monday Challenge - Fav Tool - Cricut Explore Diecutting Machine
Cards TV - AG
FFC #175 - AG


Saturday, July 30, 2016

Stacy's Flip Book!

I recently did a flip book swap with my friend, Stacy, from Alaska, and picked out these fun Project Life cards from the Bloom collection to create it. Here's a look at what I did. For my cover I used a card that had a blank journalling area where I used a nice sentiment stamp that I found at a garage sale last year. I added my friend's name using letters I cut from Tim Holtz paper and added a seam binding ribbon that I coloured with Distress Stains.

Here's a look at the front and back cover opened up. I found that laying down a thin line of tacky glue where I wanted to add the washi tape helped make sure it was going to stay stuck. 

Inside, with the two middle flaps folded in I added some stamps and papers as well as a smaller 3x4 journaling card flap.

Here's a look at the flap opened up on the right and the left flap opened. I added a little envelope full of goodies and made a little tag for the front.

When the right side opens there is another journaling card attached along the top edge, and I added some handmade tags to a little journaling card pocket.

I added some stamps snd stickers under that little flap. You can see the tags I tucked into that pocket above, here. 

This was such a fun project to do! Have you tried a flip book, and if so what are your tips? If not, grab some 4x6 papers or journaling cards, some washi tape and left over craft supplies and see what you come up with! Hope you have a happy, crafty weekend!

Linked to:
Simon Says Stamp Wednesday Challenge- AG
The Casual Craftlete - The Creative Gallery #191

Monday, July 11, 2016

Pretty Cute Stamps July 2016 New Release Sneak Peeks!

I'm so excited to bring you a sneak peek at the July 2016 Digital Stamp release from Pretty Cute Stamps! 


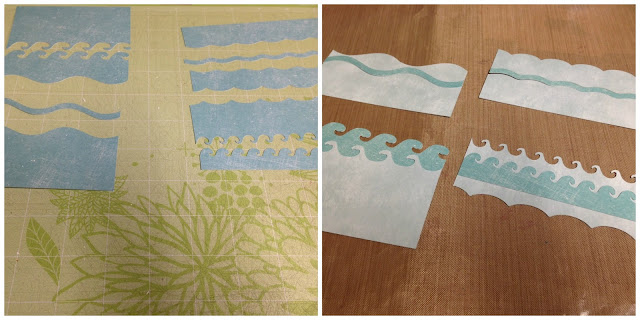
For my project today I created a tag using the Wave Borders digital stamp set. This is a super cool set! It comes with the SVG files as well as the JPEG files for these borders! This means you can cut the waves out with an electronic diecutting machine as well as printing out your waves to colour in. I've combined both these techniques on my tag and love how it turned out!


I used my Cricut to cut out these wave borders in a rectangular shape on a two toned paper and then played around with how I might layer them! I also printed the digital stamps from my computer onto white cardstock - I love the stitching lines on this wave - and I used Distress Inks to add some colour to each layer.

This sweet sailboat and sentiment are also in the new releases, from the Sail Away digital stamp set. I coloured the sailboat with Prismacolour Markers and added some Stickles to the heart. I used some Fancy Pants Design beach paper and printed the sentiment directly onto it before cutting with a Spellbinders die. I found some brown string in my stash, which I wrapped around the bottom of my tag and also used at the top with my ribbon.

I used the Anchors Aweigh digital stamp set (another new release!!) as a cut file with my Cricut Explore and cut this anchor silhouette. I decided I wanted to add a little bling - so this fun embossing powder with green and gold flecks was perfect!

After layering my waves I used my fingers to lift the edges a bit to give some dimension. 

For the background I used clear embossing powder over a stenciled circle for my sun and added some pinks, oranges and blues to create a sunset. A few water droplets adds a pretty effect. The coordinating Distress Stain colours were perfect to colour in my seam binding ribbon and allowing it to dry after crinkling it up.

Be sure to head over to the Pretty Cute Stamps blog where you'll be amazed at all the awesome sneak peeks of the brand new releases available tomorrow! You'll be able to download this cute FREEBIE digi stamp while you're there!

Don't forget to come back for the blog hop tomorrow. Thanks so much for stopping by!

Linked to:
Simon Says Stamp Wednesday Challenge - Photo Inspiration


Monday, July 4, 2016

FCCB #280 - National Ice Cream Day/Month

Welcome to another Challenge Me Monday...


Challenge #280 National Ice Cream Day/Month

This Weeks Sponsor is:


And we are giving away a $25 Amazon gift certificate, courtesy of Penny Light (our newest Design Team member)!

To qualify for the prize, be sure to use at least 1 Cricut cut on your project and if it's not obvious, let us know what cartridge you used. If you use a Cricut Explore machine, at least one cut must be from the Cricut catalog of images.

For my project I'm using the Sweet Treats Cricut cartridge to make two sweet ice cream treat cards! Both the tags and ice creams cones come from this cartridge, and I used sentiments from the Just Chill stamp set from Pretty Cute Stamps for my tags. 

I used paper from a Recollections 6x6 resist paper pad, which I watercoloured using Distress Inks. 

Then, I used Distress Stains in matching colours to colour my seam binding ribbon. I love using this method to colour ribbon - and when you spritz it with water I love how the colours blend!

Finally, I added some Wink of Stella and Stickles to add some shimmer and glitter to the strawberry and sprinkles. 

Here's a look at this sweet stamp set I used!
 Just Chill 
Thanks so much for stopping by today! Be sure to head over to the FCCB blog to see what all the other design team members have come up with - and enter your own for a chance to win!!


Tuesday, June 14, 2016

Distress Stained Kraft Resist Card!

Hi Crafty Friends! I'm back today with an inky card I made while watching the Day 5 video from Tim Holtz' Creative Chemistry 101. This was such a great refresher and I can't wait to try out all the other techniques. This card focuses on using Distress Stains and stamping.


I started off by cutting a piece of the 12x12 Kraft Resist paper pad into a 4 x 5.25" piece and first adding a light layer of Picket Fence Distress Stain. Then I added Worn Lipstick and Shaded Lilac and dried my background. You can see the resist script standing out below.

Next I took Distress Inks and blended them onto my background. I love how this adds another layer of inky fun!

I used a grey shade of Archival Ink to stamp this Tim Holtz man with the umbrella and used - my new favourite! background stamps to stamp around the edges. I added some Utee to some stamped images to add a bubbly, watery effect. I find if you heat the image from behind it will melt easier without blowing the powder around.

Here's a look at the envelope where I used some coordinating Tim Holtz stencils and stamps. You can also see how the resist really shows up after layering on some Distress Inks! I added a little banner, popped up with foam dots, with a couple more Distress stains blended onto the Kraft paper and a Tim Holtz sentiment stamp using Black Archival Ink.

Thanks so much for stopping by today! Don't forget to also check out the Sneak Peeks that are going on at the Pretty Cute Stamps blog featuring the June 2016 New Releases and come back Thursday for the big Blog Hop!


Tuesday, May 10, 2016

Art Alchemy Mixed Media Tag!

I hope everyone enjoyed a lovely Mother's Day on Sunday! Any day spent with my girls is a blessing, and of course my husband and girls spoiled me. I even had time to work on this pretty tag! Recently my friend, Laura, let me borrow her Art Alchemy Metallique Acrylic Paints by Finnabair! Good friend, hey! Well, I love them.... I tried them on chipboard, metal and thought I'd give them a swipe on this manilla tag.

They have such a lovely metal sheen, and wonderful coverage! After layering on my paint I used Distress Inks to sponge on some colour on the remaining unpainted areas of the tag. I love how the paints just pop and look like they're actually added on top of the Distress Inks! After that I stamped an image with Ranger Archival Black Ink.

Next, I used a Dina Wakley stencil to add some Texture Paste to my project and added one of the metal pieces I painted with those fun Finnabair Paints. I heated it with a heat gun, so it actually bubbled a bit, and I think if I'd let it air dry it would have been smoother. But hey, sometimes a girl just can't wait, right?! I cut a Tim Holtz Sticker from the Chit Chat book in half and added it behind my metal frame.

 Here's a look at my finished tag - 

The little wooden butterfly and dragonfly are from CTMH and easily coloured up with Distress Markers. The sequins from 28 Lilac Lane add an extra bit of shimmer and shine around the page.

You can see how nicely the chipboard with the heart cutout covered using the Art Alchemy paints. This was just one coat! I layered on a left over Heartfelt Creations flower from Holly's Make 'n Take last week, adding some Stickles, and tied on my seam binding ribbon that I coloured with Distress Stains.

Thanks so much for stopping by! I hope you'll pull out some paints and use them on something you haven't tried before!

Linked to: