Showing posts with label Distress Crayons. Show all posts

Friday, October 25, 2019

Creepy Caravan Blog Hop!

Well hello friends! I'm super excited because it's Day 12 of the 13 Days Of Halloween Series... and the Creepy Caravan Blog Hop!!


You'll find 12 amazing, spooky projects on this hop - perfect to inspire you to get in Halloween mood!! Here's the hop line up:

It's Oddly Appealing
Whimsy Chic Papercrafts
Kelly Parker Designs
Scrap Savvy Creations - Cassandra
Life in a Snapshot
Karla Yungwirth Designs That's ME!
Scrapstorian- Brande Davison NEXT
Stephanie Eaton
Roni Johnson  a.k.a. Ink Stained
Matter of Crafts/Jessica Larios
Jennifer Gagne (KaezMum)
Nelly's Artistic Creations

For my project I'm sharing a perfectly creepy haunted house! Be sure to scroll down to catch the video to see how this came together 👻 as well as some fun BLOG CANDY!


Tim Holtz Ephemera, Distress Stains, Crayons, Oxides and Oxide Sprays worked awesomely together to add to this dollar store wooden house, taking it from boring to spooky in no time!


I dug into my Halloween stash to find whatever worked! This Simple Stories pumpkin sticker was just the right size for one of these girls to hold. I coloured their outfits with Distress Crayons and I love the vintage look. 


Stickles added in different areas give a sparkly effect - I firmly believe every event needs sparkle!


Emerald Creek Craft Supplies Embossing Powders add neat touches to stamped images as well as random areas that just need a touch of blood. I love how my new Studio Katia pumpkin border stamp fits on the sides of the house. 


Here's a look at the video where you can see all the fun supplies I used and just how it came together-


BLOG CANDY!!
I'm giving away a $10 gift certificate to the Studio Katia store to one lucky person who leaves a comment below! Leave your comment by October 28th and I will announce the winner on October 29th. I've used several Studio Katia products in my project today, including the Autumn Borders stamp, Square Brick Stencil, Silver Foil Star Sequins and Spooky Satin Confetti!
Next up is the awesome Scrapstorian- Brande Davison

Thanks so much for stopping by today! I hope you have a fantastic weekend ahead with lots of creatively creepy crafting ideas!

Linked to:
SSS Monday Challenge - Spooky
SSS Wednesday Challenge - Fall Colours

Monday, March 25, 2019

Wish Layout with Altered Chipboard!

Hello! I sure hope you had an awesome weekend! It was a little drizzly Sunday here so we stayed in our p.j's and did stuff around the house, crafting, a little cleaning... and enjoyed a bit of a lazy day. Today, I'm giving you a look at the layout that I'm sharing on the Southern Ridge Trading Company blog today using their gorgeous chipboard and stencil from the shop. I love this photo of Erica just taking the time to pick up a dandelion and blow the seeds. It reminds me how important it is to take time to connect with nature.


Here's a look at the video where you can see exactly how I altered the chipboard and put everything together:


Be sure to stop at the Southern Ridge Trading Company blog for closeups, details and a full supply list. Thanks so much for stopping by, and have an awesome week friends!


Monday, March 11, 2019

Beautiful Memories Layout with Altered Chipboard!

Hey there! Hope you're all doing well 😊I had a great weekend! On Friday I taught two Simple Stories classes at the Scrap Shotz pop up shop, Saturday I got to scrapbook for part of the day, and Sunday we did family stuff. Today, I'm back to share with you a pretty Spring layout using some a butterfly wings stencil and beautiful chipboard from Southern Ridge Trading Company and a lovely photo my sweet sister sent to me of her and her little one.


You can find the SRTC supplies here - Butterfly Wings StencilButterfly Swirl Combo, and Spring Butterfly Wreath and find a list of the rest of the supplies as well as closeups and details on the Southern Ridge Trading Company blog. Have an awesome week friends!


Saturday, December 9, 2017

Bright Lights Blog Hop with Scrap 'N Stamp!

Hi friends! I'm really excited to be part of another awesome blog hop with the Scrap 'N Stamp team, and this month we are featuring the fantastic Lawn Fawn String Of Lights die set!! If you've come from Julia's Blog you're in the right place. If you want to start at the beginning, head over to see Tara at the Scrap 'N Stamp Blog. Wait till you see the amazing projects everyone creates with this lovely die set...


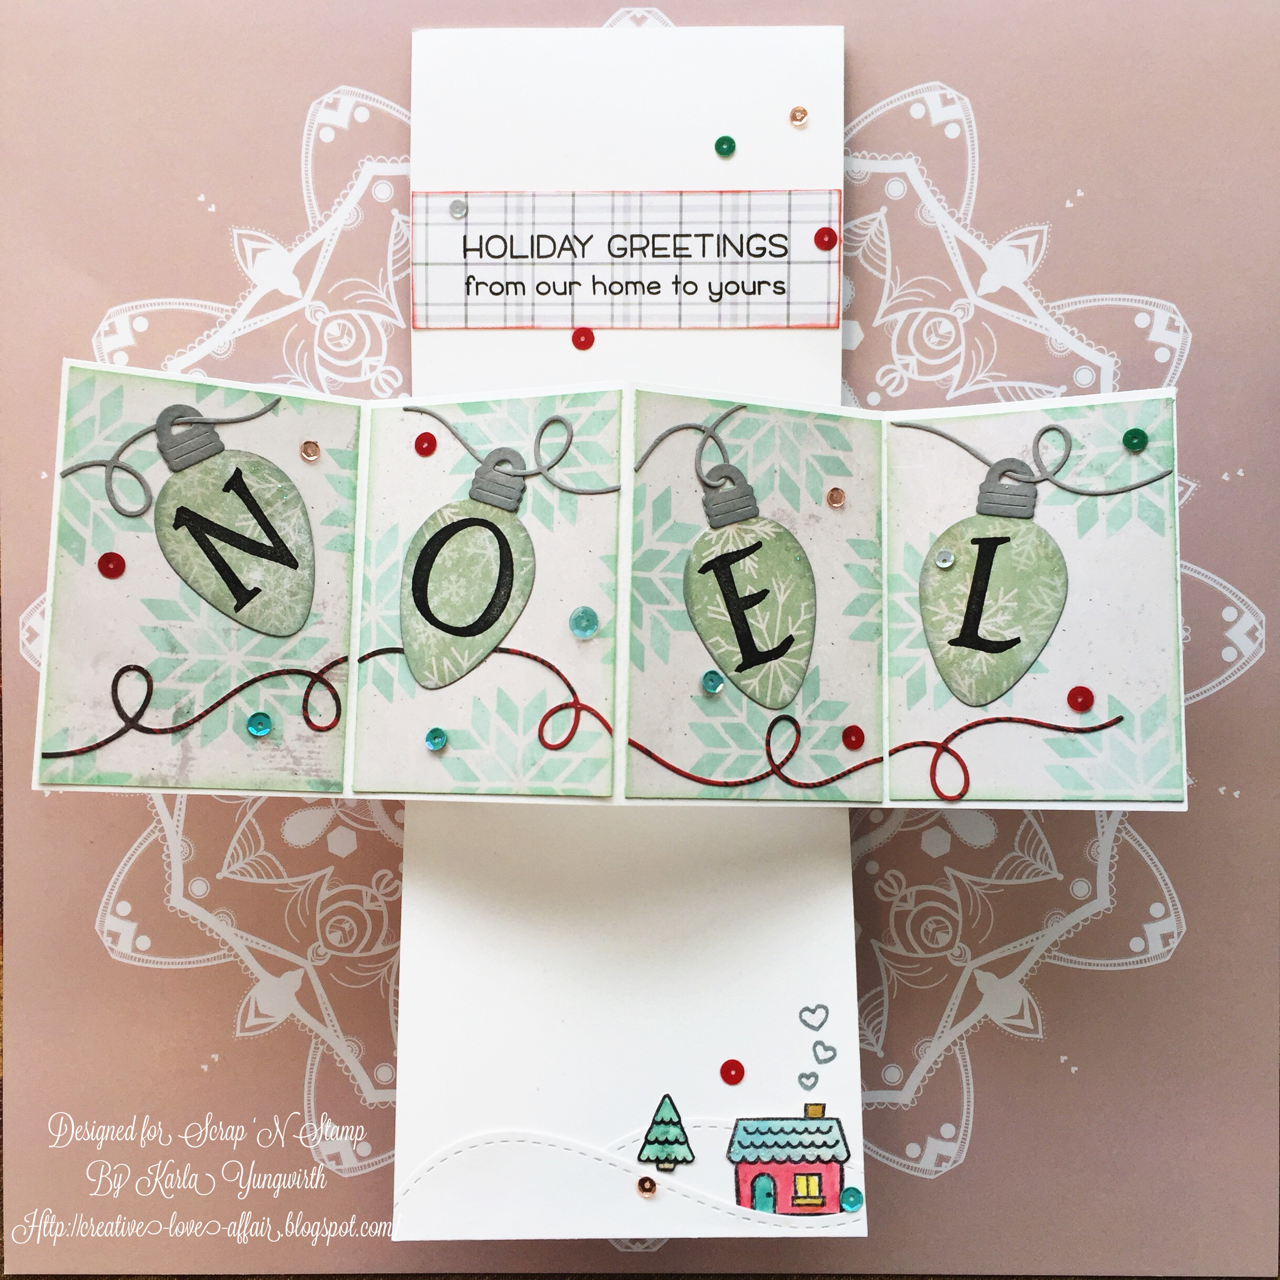
For my project today I've made a beautiful Christmas Twist & Pop card. I love how much fun you can have decorating this style of card! I used some Tim Holtz Christmas paper from his new 8x8 paper pad on the background of my card, as well as using two different patterns to diecut the little light bulbs from.

You get three different sizes of light bulbs in this set, which includes one that has the little highlight strip cut out and one that is a full bulb - so you can layer them or use them separate. You also get two different types of toppers in each size and the string, which is a lovely, twisty scroll. I decided to layer my bulbs and pop them up with foam dots between the layers. I added a bit of Glossy Accents on the highlight and some pretty SpiegelMom Scraps sequins. .

I used Distress Crayons to watercolour in images from the Lawn Fawn Winter Village stamp set and used some Stickles on the snowy areas of the the homes. The Your Next Stamp Double Stitched Hills dies created a snowy background for my little scene, and I used the string die again along the bottom as a loopy scroll.


Here's the Twist & Pop effect when the card opens! So cool! If you want to see directions on how to make this card you can check out the details on this video HERE I made for another card in the same style.


I used the pretty In The Making Cling NOEL stamp on top of the larger bulb diecut. This stamp is great as each letter is separate so there's no masking required. I used more of the Tim Holtz Christmas paper for the bulbs and background of the pop out section of the card. Along the bottom of the card I've layered another watercoloured house and snowy hill, leaving space to add my handwritten message.

On the top of the card I've added a stamped sentiment from the Winter Village stamp set along with a few more pretty sequins.


BLOG CANDY!!

Scrap'n Stamp is giving away a New Release Lawn Fawn Stamp Set for every stop on the blog hop! So make sure to take a moment to comment on all the designers' fabulous work. Winners will be announced and must email Scrap'n Stamp to claim their prize! GOOD LUCK! This prize is open internationally.


Here's the Blog Hop line up:

Tara Nixon Cox

Julia Chupik
Karla Yungwirth - You are here!
Nancy Frustaci
Amy Rysavy
Karen Warner
Amber Trubiak


Thanks so much for stopping by today! Be sure to head over to Nancy's Blog next to see her beautiful project - and you can check out the Lawn Fawn String Of Lights die set at the Scrap 'N Stamp store. Have an amazing, crafty weekend - and good luck on the giveaway!

*I've used affiliate links to the Scrap 'N Stamp store (Canadian Shipping only) to support my blog. Thank you!


Tuesday, November 14, 2017

Scrap ‘N Stamp - Distress To Impress Blog Hop!

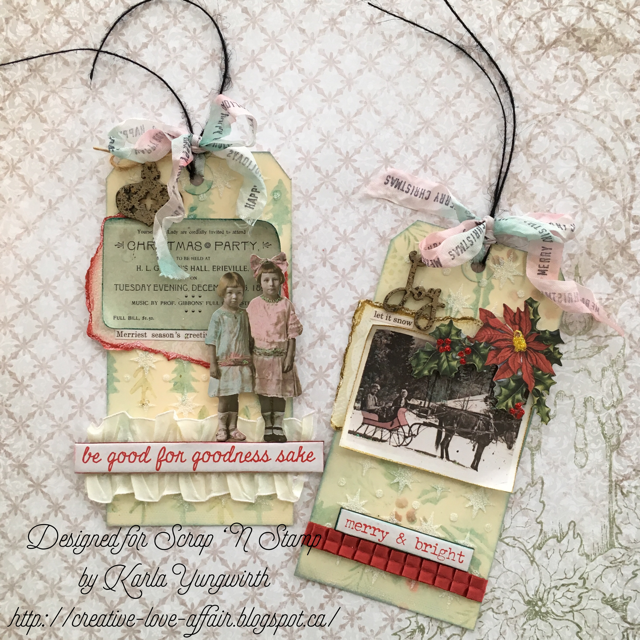
Hello! I hope you’ve been having a fantastic week so far! I’m so excited to be joining the Scrap ‘N Stamp blog hop today where we are sharing projects using the fabulous set of Tim Holtz Distress Crayons #9. I have to admit, I haven’t played around with Distress Crayons for quite some time, But I had so much fun once I pulled them out and started playing! They have some really cool properties, and one of my favourite ways to use them is as a watercolour medium, but I’ve tried several different techniques here today. I'm the last stop on the hop, and if you've arrived from Nancy's blog you're in the right place. If you want to start at the beginning, head over to see Tara at the Scrap 'N Stamp blog. Here's a look at the two tags I made today. I'm sure two special people are going to love seeing these on their Christmas gifts (if I can part with them 😉). Be sure to check out below how one lucky commenter from each blog will win their own set of crayons - even international peeps!


I started off by using two Tim Holtz stencils - the trees and the holly, and scribbled the Barn Door, Pine Needles and Brushed Corduroy Distress Crayons from the set onto my craft mat. I spritzed each colour with a little water and used a sponge tool to pick up the colours and stencil them on. It gave them a soft watercolour look, which I love! After the background was dry I used this star stencil to add a translucent texture paste over top and then added Soft Fallen Snow embossing powder from Emerald Creek Craft Supplies. I lightly heat embossed to add a lovely puffy texture and then added some Tumbled Glass and Weathered Wood Distress Ink around the edges for a bit of added shadowing.

Next I used the Distress Crayons to colour in the adorable little girls from the Tim Holtz paper dolls set and the sleigh from the Tim Holtz ephemera by scribbling again on the craft mat, but this time using a waterbrush to pick up the colour and add it to the areas I wanted. The crayons watercolour so beautifully, and really I can't wait to use them more for this! Next I used them around the edges of the chipboard sentiments and the party invite by rubbing them directly on the edges and then using my finger to smudge around to blend the colour slightly.

My last technique was to stamp seam binding ribbon with a couple Tim Holtz sentiment stamps using Archival Ink. Next, I scribbled the crayons onto the craft mat again, spritzed them with water, and lightly dipped each section into the colours. I crinkled up the ribbon and let it dry to give it a cool, crumpled look.

I glued all my elements down, adding a Kaisercraft wood veneer embossed with Emerald Creek Charred Gold, a pretty pointsettia embellished with Stickles and a lovely red ribbon along the bottom. You can see I even used the Brushed Corduroy to edge the torn paper behind my photo - I love this effect!


 On the second tag I embossed another wood veneer embellishement and layered on these adorable girls, ready for their party, using foam dots to give them some dimension above the ribbon and chipboard.


 BLOG CANDY!!
Scrap'n Stamp is giving away a set of Distress Crayons for every stop on the blog hop! So make sure to take a moment and comment on on all the designers' fabulous work by November 21st. Winners will be announced November 24th and must email Scrap'n Stamp to claim their prize! GOOD LUCK! This prize is open internationally.

** Also all the Distress Crayons are on SALE (Canadian Shipping only) for 25% for the rest of this month!!

Here's the Blog Hop line up:

Tara Nixon Cox

Amber Trubiak

Amy Rysavy

Julia Chupik

Karen Warner

Nancy Frustaci

Karla Yungwirth - You are here!

Thanks so much for stopping by! I hope all these Distress Crayon projects have given you lots of inspiration to grab some of your own and get started on all the cool ways you can use them! Have a super awesome week, and don't forget to comment for a chance to win!


Wednesday, January 4, 2017

Distress Crayon Watercolour in a Decorated Frame!

Happy New Year Friends!

I hope you all had a fantastic Christmas and New Years! I took a little bloggy break to enjoy some family time and a few jammie days! I'm back today to share a gift I made for my sister. I love giving at least one homemade gift to her, and I was really pleased with how this turned out.

I started out by using a page from the Prima Watercolor Coloring Book. I knew this book was something I had to have as soon as I saw it last year! You can use whatever watercolouring medium you like on the pages, and for this page I chose to use my Distress Watercolor Crayons. Love them!!


Around the silver frame I added a couple clusters of embellishments - diecuts, paper ephemera, gold stars and sequins and pearls from a 28 Lilac Lane embellishment kit. I used Distress Inks to add some colour around the edge of this cute bird diecut. Inside the cute frame I added a mini card from the Pink Paislee Take Me Away 6x6 paper pad.

At the top I used feathers that I diecut with my Cricut and shaded with Distress Inks along with an arrow and more stars from a Project Life kit and popped up a layer to add dimension.

Well, my sister loved it - and sent me a photo of it on a gallery wall in her bedroom! 

Thanks so much for stopping by today! Hope you're staying warm and cozy this week - and getting some crafty time ;)

You can follow me on social media at these links here:

Linked to:
PDE Linky Party - Anything Goes
Word Art Wednesday - AG #264/265
DL Art - January Linky Challenge
Little Scrap Pieces - Show It Off Saturday


Monday, September 12, 2016

FCCB #285 - Embossing!

 Happy Monday and welcome to another Monday challenge!


Challenge #285-Embossing
Create a project that features wet or dry embossing!

This Weeks Sponsor


The prize is 7 digital stamps!


And we are giving away a $25 Amazon gift certificate, courtesy of the FCCB Design Team!

To qualify for the prize, be sure to use at least 1 Cricut cut on your project and if it's not obvious, let us know what cartridge you used. If you use a Cricut Explore machine, at least one cut must be from the Cricut catalog of images.

Here is my project using the super cute Bugaboo Brat School Crayon Girl digital stamp and Cricut CTMH Artistry and Basic Shapes cartridges. I created a circular card base by welding two circles together, and then cut this cool globe shape to fit on the front. 

Since our theme this week is Embossing, I chose to use a flower embossing folder to emboss the top green cut from my globe, as well as the ruler, which I also highlighted with Distress Ink. Some awesome Distress Crayons add some fun effects as well! I finished it off with a few pretty sequins - I'm totally addicted to these lately!


I used alcohol based Prismacolor and Hobby Colour Markers to colour in this cute Crayon Girl image and then added on some Stickles for glittery shine!

The stamp set Color My World from Pretty Cute Stamps was the perfect addition! I heat embossed the sentiment on the geotag, which was cut from the Artistry cartridge and then edged my circle with Versamark before applying this cool Verdigris embossing powder from Ranger. I love the flecks of gold in this powder! I popped up the center to give it some extra dimension.

Inside, I used some more stamps from the Color My World stamp set and added some more Tim Holtz Distress Crayons.

Thanks so much for stopping by today! Don't forget to head over to the Fantabulous Cricut Challenge Blog to see what all the other sponsors have come up with - and enter your own project using a Cricut cut for a chance to win!


Thursday, August 11, 2016

Pretty Cute Stamps August New Release Blog Hop!

Thanks so much for joining us for the August 2016 Digital Stamp Release Blog Hop, where we are all sharing projects featuring the new digital stamps this month that are now available in the Pretty Cute Stamps Store!


If you came from Larissa's Blog - Muffins and Lace, you are in the right place. If you just stumbled across this post and would like to start from the beginning, please visit the Pretty Cute Stamps Blog

For my project for the hop, I've used the Little Sweetie stamp set to create a cover for my Dylusions Art Journal! I've wanted to decorate the cover for my art journal for a very long time, but just couldn't decide on what I wanted. When I saw this adorable cupcake girl image, I knew it was perfect!


I first layered some pretty papers from the Pink Paislee Fancy Free collection and Mod Podged them onto my journal. Then I gessoed the remaining spots on the background, which added a white painted layer. After printing my Little Sweetie out onto white cardstock, I printed her again onto the patterned paper I wanted for her hair and dress. I cut out the 'sweet' sentiment and added it to a Fancy Free circle and tore around the printed Cherry On Top sentiment. How cute is this sentiment?!!


I've been having so much fun taking the Online Card Class Creative Chemistry 103 and learning some new techniques using my Distress Crayons, so I definitely wanted to incorporate them on my Art Journal! I used several different stencils to apply texture paste to my background. After the paste dried I added a layer of Collage Medium by Tim Holtz and when that dried the inky fun started!

I lightly rubbed the Distress Crayons onto my textured background and smudged it around with my finger. I love the way it blends with the other colours and highlights the stenciled areas!

I added Stickles to the cherry and Little Sweetie's lips, earrings and jewelry - because a girl's gotta have bling!

I used Prismacolor and Hobby Colour Markers, which are alcohol based, to colour in all the areas that I didn't paper piece, and then used the markers to highlight my paper piecing.

Here's a look at this super sweet stamp!
Little Sweetie


Blog Candy!! There is a $15 Gift Certificate to the PCS Store available to win! All you need to do is:
1) Comment on each of the blogs. 
2) For extra chances to win you can LIKE Pretty Cute Stamps on Facebook and/or sign up for the Pretty Cute Stamps mailing list. (Leave an extra comment for each on the Pretty Cute Stamps blog as your entry)
A random winner will be chosen on Tuesday, August 16, 2016.

Be sure to check the Pretty Cute Stamps Store to pick up your favorite sets!

 August 2016 New Releases

There is also a FREEBIE digital stamp available for you today at the Pretty Cute Stamps blog!


Wonky Cake

Now, you can head over to the next stop on the hop- Tasha's Blog - Crafty Pink Pixie!

If you get lost along the way, here's the lineup!