Showing posts with label Art journal. Show all posts

Thursday, August 11, 2016

Pretty Cute Stamps August New Release Blog Hop!

Thanks so much for joining us for the August 2016 Digital Stamp Release Blog Hop, where we are all sharing projects featuring the new digital stamps this month that are now available in the Pretty Cute Stamps Store!


If you came from Larissa's Blog - Muffins and Lace, you are in the right place. If you just stumbled across this post and would like to start from the beginning, please visit the Pretty Cute Stamps Blog

For my project for the hop, I've used the Little Sweetie stamp set to create a cover for my Dylusions Art Journal! I've wanted to decorate the cover for my art journal for a very long time, but just couldn't decide on what I wanted. When I saw this adorable cupcake girl image, I knew it was perfect!


I first layered some pretty papers from the Pink Paislee Fancy Free collection and Mod Podged them onto my journal. Then I gessoed the remaining spots on the background, which added a white painted layer. After printing my Little Sweetie out onto white cardstock, I printed her again onto the patterned paper I wanted for her hair and dress. I cut out the 'sweet' sentiment and added it to a Fancy Free circle and tore around the printed Cherry On Top sentiment. How cute is this sentiment?!!


I've been having so much fun taking the Online Card Class Creative Chemistry 103 and learning some new techniques using my Distress Crayons, so I definitely wanted to incorporate them on my Art Journal! I used several different stencils to apply texture paste to my background. After the paste dried I added a layer of Collage Medium by Tim Holtz and when that dried the inky fun started!

I lightly rubbed the Distress Crayons onto my textured background and smudged it around with my finger. I love the way it blends with the other colours and highlights the stenciled areas!

I added Stickles to the cherry and Little Sweetie's lips, earrings and jewelry - because a girl's gotta have bling!

I used Prismacolor and Hobby Colour Markers, which are alcohol based, to colour in all the areas that I didn't paper piece, and then used the markers to highlight my paper piecing.

Here's a look at this super sweet stamp!
Little Sweetie


Blog Candy!! There is a $15 Gift Certificate to the PCS Store available to win! All you need to do is:
1) Comment on each of the blogs. 
2) For extra chances to win you can LIKE Pretty Cute Stamps on Facebook and/or sign up for the Pretty Cute Stamps mailing list. (Leave an extra comment for each on the Pretty Cute Stamps blog as your entry)
A random winner will be chosen on Tuesday, August 16, 2016.

Be sure to check the Pretty Cute Stamps Store to pick up your favorite sets!

 August 2016 New Releases

There is also a FREEBIE digital stamp available for you today at the Pretty Cute Stamps blog!


Wonky Cake

Now, you can head over to the next stop on the hop- Tasha's Blog - Crafty Pink Pixie!

If you get lost along the way, here's the lineup!

Tuesday, January 26, 2016

Happy New Year Art Journal Tutorial!

Hi there friends! I was recently making an art journal page, inspired by the amazing and talented Vicky Papaioannou's New Year Art Journal video, and thought I'd make a little tutorial. Sometimes when you look at a mixed media piece it's hard to pull apart the layers and see where to start. It's really not that hard and following these steps you can create your own piece - either in an art journal, on a canvas, or even on a tag.

Here's a look at my art journal page in my Dylusions Art Journal:

And here are some step by step directions to get you started:

I used a  white gel pen to write down my goals around the page. This beautiful script stamp, sequins and stars are from the Believe Script stamp set by Pink and Main.


Thanks so much for stopping by today! Have you set any goals for 2016? I hope this inspires you to get out some paints and inks and have fun playing!

Linked to:
Pink & Main Challenges - #5 Sparkle
Craft Stamper Magazine - January Challenge AG with a stamp
Word Art Wednesday - AG
Use Your Stuff  - Sequins or Glitter (stamped sequins!) 
DL Art - Thankful Thursday January Linky Challenge


Tuesday, September 15, 2015

Mermaid Art Journal Tutorial!

I'm posting today at the Scrapendipity Way Of Life blog and I'm sharing this lovely art journal page I made using lots of mixed media supplies and the Julie Nutting Mermaid doll stamp by Prima!


Here's a little tutorial showing you how I made it-

I started off with my Dylusions Journal and used Distress Stain to rub colour across my pages. I had previously rubbed off some stencils on these pages and you can see some colours underneath.

I then used Dylusions yellow paint over a Tim Holtz sunray stencil to create my sunrise and spritzed the pages with Perfect Pearls mist to add shimmer and blend the colours slightly.

I used more Dylusions paints and stencils to create a background. I sponged the blue paints through the TH flourish stencil and then used the circle stencil to add white circles. I used bubble stamps and the purple paint to stamp on bubbles, which you'll be able to see below.


 Here's Erica working with some purple paint and stamping those fun bubbles!

I paper pieced and coloured my stamped images (I used the BoBunny Boardwalk paper for my mermaid) and then Mod Podged them onto my paper. 

I added some stamps on top of my journal and then used the Dylusions Ink Sprays to paint in my leaves. I love using the sprays this way! I wanted to distress the cute sea creature stamps a bit so I stamped a Dylusions background stamp over top using Vintage Photo Distress Ink.

You can see how the Dylusions purple paint bubbles resists the spray that I painted onto the leaves and it seems to blend into the background! I absolutely love this 4x6 journaling card from the Laughing Lola Picture My Life cards by CTMH. I love the cards included in these collections - there are so many things you can use them for!


Lastly, I added some Distress Markers to the stamped images and then used Glossy Accents and Stickles around my page. You can see how the butterflies really pop after adding the Glossy Accents! I traced around my Mod Podged images with a brown Distress Marker and used a waterbrush to lightly blend the marker around each image.


I just love how these pages turned out! I love all the layers and the way each medium works together. This mermaid doll is one of my favourites! 


Thanks so much for joining me today! I hope you have a lovely week! Be sure to check back this week - there is lots going on with the Pretty Cute Stamps September Release as well as a fun Birthday Bash Mini Crop on Saturday!!

Linked to:
Simon Says Stamp Wednesday Challenge - use a stamp
Simon Says Stamp Monday Challenge - love this technique (layering different mediums & using Dylusions sprays to paint with)


Tuesday, June 2, 2015

Enjoy Today Art Journal!

I am super pumped that I finally got to try out the creamy, dreamy Dylusions Paints! If you haven't yet and are interested in them, let me tell you - you are going to love them! I gathered a bunch of supplies I was thinking of using and just decided to plunge in and see where it took me. I wanted to just play around with them, so what better place to do that than the Dylusions Art Journal!


 First I started off by painting the left page white and the right black. Then I used the two blues to sponge over a Heidi Swapp Enjoy stencil and some Distress Paints to sponge over a Tim Holtz stencil on the white page. On the left I used both blue Dylusions paints and some Cracked Pistachio to sponge over a scrolly Tim Holtz stencil. I think this was my fav colour combo - and the black behind it looks awesome! I used some Abandoned Coral and some yellow Distress Paint over the Today Heidi Swapp stencil.


This is the first page completed - I added some background stamps, Ranger Texture Paste through a Dylusions stencil, and some of the beautiful ribbon I received from Karen over at Little Scrap Pieces!  I love these Dylusions fashion stamps and I thought they'd go perfectly on these pages. I paper pieced them with some papers from my stash and glued them onto my pages. A Dylusions sentiment stamp and a Heidi Swapp shiny silver sticker finished it off!


On my second page I added some stamped images using Memento Lux Wedding Dress white ink - I absolutely love how this stamps so beautifully on the black background! To give my paper piecing shading and definition I added some Distress Markers around the edges.


Here's a look at both pages open in my journal -

Thanks so much for joining me today! I hope you're inspired to try out something new - maybe these fun paints or a stencil, or maybe just to get some fun goodies out of your stash and see where it takes you!

Linked to:
Little Scrap Pieces - show it off Saturday


Monday, April 13, 2015

FCCB #249- Welcome Spring

Welcome to another Challenge Me Monday...


Challenge #249 Welcome Spring
Make a project using whatever reminds you of Spring!

This Weeks Sponsor:


Winner will receive one Craftin Desert Diva's stamp set of their choice!
(USA address only)

To qualify for the prize, be sure to use at least 1 Cricut cut on your project and if it's not obvious, let us know what cartridge you used. If you use a Cricut Explore machine, at least one cut must be from the Cricut catalog of images.


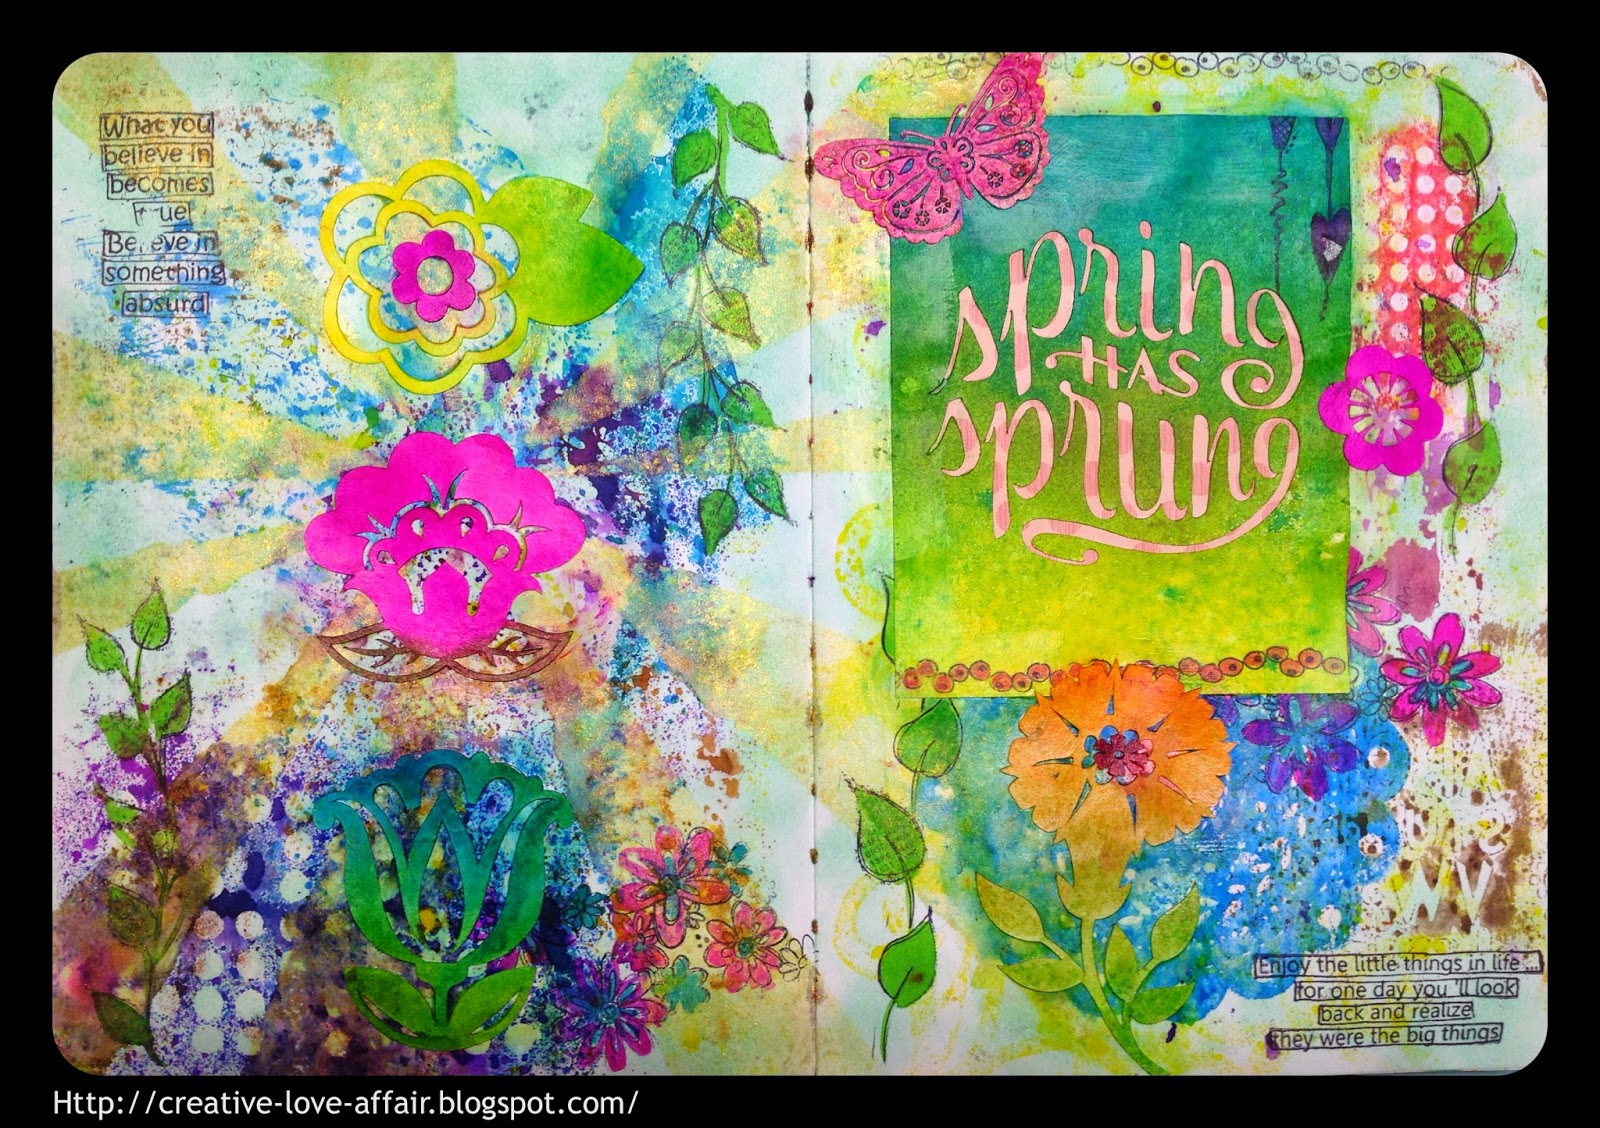
For my project this week I decided to make an art journal page. I used the Home For The Holidays Spring & Summer cartridge for the 'Spring Has Sprung' cut and the Florals Embellished cartridge for the flowers and butterfly. I cut everything from watercolour paper and then used Dylusions sprays on them to colour them in bright spring colours. I spritzed with Perfect Pearls spray mist over top of the Dylusions sprays to blend and add some shine - I love this effect!


My background pages were pages that I just had previously rubbed left over sprays on after stencilling other pages. I wasn't sure what I was going to do with these pages, and this turned out to be the perfect opportunity! I used a Heidi Swapp stencil and a shimmery gold spray over top of the background to spray the sunray stencil. I added Dylusions stamps and sentiments and then coloured them in with Dylusions sprays using a paint brush dipped directly into the spray. My diecut flowers are lined up down the middle of the first page, right in the middle of the sunray!

I used Mod Podge to layer the watercolour diecuts on my background after stamping and sponging the new Pistachio Distress Ink all over my pages.

 I hope Spring really has sprung here in Alberta, Canada! I'm ready for sure!!

Thanks so much for joining me today! Be sure to head over to the Fantabulous Cricut Blog and check out what all the other talented Design Team Members have done - and enter your own project with at least one Cricut cut! I hope you enjoy your week :)

Linked to:
Little Scrap Pieces -Show It Off Saturday
613 Avenue Create - AG (1st entry)
Create & Inspire - #18 AG (2nd entry)
Party Time Tuesdays - #197 AG (1st entry)
4 Crafty Chicks - #241 Die Cuts (2nd entry)
Jo's Scrap Shack - #83 Florals & Butterflies
Little Red Wagon - #284 Spring Is In The Air
Simon Says Stamp Monday Challenge - In the Middle (on my first page - diecut flowers)
Simon Says Stamp Wednesday Challenge - April Showers/Spring Flowers


Tuesday, January 29, 2013

Art Journal Pages 3 & 4

This weekend my sister came over and we worked with some more Dylusion Inks - so fun! She sprayed on watercolour paper and cut it up to make some really cool card backgrounds, which she embellished.

I worked on my Art Journal. I sprayed my background first and then spritzed through a stencil with water for a bleached effect. I used the Dyan Reaveley stencil with the circles and then used Picket Fence Distress Stain on the checked border. I also picked up her stamp set with the leaves and borders, which I love!! I did some stamping and painting and then wanted to brighten it u a bit so I stamped some balloons on watercolour paper with Archival Ink and watercoloured them using Tombpw markers. I stamped a few of Tim Holt's stamps on white paper, distressed them and glued them on. I also had a piece of sticky back canvas which I cut out a couple balloon shapes and circles from and stuck them on my page.

I am really loving these mists, and I think they will actually get me using my other mists more!! What fun :)

Challenges:
Scrapbookers Paradise - Using Mists
http://scrapbookersparadise.blogspot.ca/2013/01/playing-in-paradise-101-using-mists.html?m=1


Thursday, January 17, 2013

Art Journalling

I am so excited to start some art journalling in the beautiful Dyan Reavely Art Journal! I purchased 3 of the Dylusion sprays, which are gorgeous! I will definitely have to put more of those on my wish list!

I sprayed the inks on, spritzed water over stencils to create a bleaching effect, sprayed ink through the stencils and turned them over to create a negative impression as well, stamped with black archival ink, used Tim Holtz Distress Stains to stencil flowers, painted the butterflies and bird with Distress Stains, spritzed with Shimmer Spray, and doodled with a black permanent pen and a white Jellyroll gel pen.

This was sooooo much fun! Even after doing all this stuff on the page nothing soaked through to the other side of the paper! It's such a nice journal. I'm so looking forward to trying out lots of new and old techniques.

For lots of journalling inspiration check out http://artjournaling.tumblr.com/page/7 and Pinterest has some great ideas as well!

Dyan also has some great videos out showing how to use her inks and how to create amazing journalling pages. Check out http://youtu.be/4kwJxqKJYj8 .