Showing posts with label stencils. Show all posts

Thursday, March 18, 2021

Stay Home Haircut with Wild Whisper Designs & A Challenge!

Hello friends! I'm over on the Wild Whisper Blog today with a mixed media layout using some fun stencils, papers and ephemera! I used my Cricut Maker to cut out my stitched and stenciled background as well as to cut out the cutfiles for the title. My daughter was very excited to get a new look!


Be sure to use the code DTKARLA at the Wild Whisper Shop to save 10%!

Supplies:
Nicole Wright Stencils: Circlet & Fanciful Blossoms

We also have a brand new Monthly Challenge for you in the Wild Whisper Community Facebook Group! I'm challenging you to use Stencils on your project and you'll have until the end of the month to enter. Check out all the details and closeups on the Wild Whisper Blog . Thanks so much for stopping by, and have an amazing and creative day!!


Tuesday, October 11, 2016

Gorjuss Fox Fall Tags!

Hi there! I hope all my Canadian friends had a Happy Thanksgiving! We had a lovely meal Sunday with family and of course too much yummy dessert, which was sooo good! I think the best is leftovers though - and turkey soup!! Ok, now that we`re all hungry, I`ll show you some cute Fall tags I created for a Happy Mail swap using some small manilla tags, Distress Inks and the cute foxes from one of the Gorjuss Girls stamp sets. I realized that for some reason I must have changed the colour of the first two photos in the editing :0, but the last photo shows the true colours of the tags! Sorry about that! I started by stamping the foxes onto kraft cardstock and colouring them in with coloured pencils before fussy cutting them out.


I sponged on some Antique Linen and Ripe Persimmon Distress Paints through some stencils and then inked over top with Distress Inks. Because the paints create a resist it looks as if they`re popping through the inks - love this effect!

I layered on some stamps from the same set, used some Vintage Photo Distress Ink and added a few extra stencils and then stamped the stars from the set with Versamark Ink and added Gold Embossing Powder. Lastly I pasted on my cute foxes and added some hemp twine from the SpiegelMom Scraps Store! Be sure to use the code MOVE35 for 35% off your order there until Oct 30th!

Thank you so much for stopping by today, and I hope you have an awesome week!

Don't forget you can follow me at the following places - Instagram, Facebook and YouTube!

Linked to:
Emerald Creek Dares - Falling Into Celebration


Thursday, August 11, 2016

Pretty Cute Stamps August New Release Blog Hop!

Thanks so much for joining us for the August 2016 Digital Stamp Release Blog Hop, where we are all sharing projects featuring the new digital stamps this month that are now available in the Pretty Cute Stamps Store!


If you came from Larissa's Blog - Muffins and Lace, you are in the right place. If you just stumbled across this post and would like to start from the beginning, please visit the Pretty Cute Stamps Blog. 

For my project for the hop, I've used the Little Sweetie stamp set to create a cover for my Dylusions Art Journal! I've wanted to decorate the cover for my art journal for a very long time, but just couldn't decide on what I wanted. When I saw this adorable cupcake girl image, I knew it was perfect!


I first layered some pretty papers from the Pink Paislee Fancy Free collection and Mod Podged them onto my journal. Then I gessoed the remaining spots on the background, which added a white painted layer. After printing my Little Sweetie out onto white cardstock, I printed her again onto the patterned paper I wanted for her hair and dress. I cut out the 'sweet' sentiment and added it to a Fancy Free circle and tore around the printed Cherry On Top sentiment. How cute is this sentiment?!!


I've been having so much fun taking the Online Card Class Creative Chemistry 103 and learning some new techniques using my Distress Crayons, so I definitely wanted to incorporate them on my Art Journal! I used several different stencils to apply texture paste to my background. After the paste dried I added a layer of Collage Medium by Tim Holtz and when that dried the inky fun started!

I lightly rubbed the Distress Crayons onto my textured background and smudged it around with my finger. I love the way it blends with the other colours and highlights the stenciled areas!

I added Stickles to the cherry and Little Sweetie's lips, earrings and jewelry - because a girl's gotta have bling!

I used Prismacolor and Hobby Colour Markers, which are alcohol based, to colour in all the areas that I didn't paper piece, and then used the markers to highlight my paper piecing.

Here's a look at this super sweet stamp!
Little Sweetie


Blog Candy!! There is a $15 Gift Certificate to the PCS Store available to win! All you need to do is:
1) Comment on each of the blogs. 
2) For extra chances to win you can LIKE Pretty Cute Stamps on Facebook and/or sign up for the Pretty Cute Stamps mailing list. (Leave an extra comment for each on the Pretty Cute Stamps blog as your entry)
A random winner will be chosen on Tuesday, August 16, 2016.

Be sure to check the Pretty Cute Stamps Store to pick up your favorite sets!

 August 2016 New Releases

There is also a FREEBIE digital stamp available for you today at the Pretty Cute Stamps blog!


Wonky Cake

Now, you can head over to the next stop on the hop- Tasha's Blog - Crafty Pink Pixie!

If you get lost along the way, here's the lineup!

Tuesday, February 23, 2016

Distress Crayon Tutorial!

I'm posting over at the Scrapendipity Way Of Life blog today, and since I picked up the Most Awesome Distress Crayons from Selena's truck last week I just had to share how I made this card with them!


I started off by taking a piece of Specialty Stamping paper, which is a little glossy and helped me move the crayons around a bit, but you could use a piece of white cardstock as well. I found some Heidi Swapp stencils and for the polka dots and hexagons I rubbed the crayon directly through the stencil. I rubbed a bit of the other crayons on the white areas and smudged it with my finger. Then, I took a baby wipe and wiped through the stencils to create a negative effect.

I used one of the crayons to edge around the piece of cardstock and then gently smudged it with my finger to blend it around the edge. I used my new Hero Arts Neon Ombre ink pad to stamp on these Tim Holtz butterflies and then shook on some clear Crystal embossing powder, which has a bit of shimmer in it. Another Tim Holtz sentiment stamp added detail to the front of the my piece, stamped in grey Archival Ink.

 Here's a close up of the finished piece. I added a bit of Pink Distress Marker inside the butterflies and a couple pink flowers at the bottom. I used the Distress Crayons to add colour to my seam binding ribbon, which Selena can get in by the roll! This is really my favourite ribbon. After rubbing it on I sprayed it with water and then rubbed it with my finger to blend it. The crayons don't automatically blend with water like the inks, but do blend when you manipulate them.

Thank you so much for joining me today! Have a fun and crafty week!

Linked to:
Simon Says Stamp Wednesday Challenge - Shake It Up (embossing powder)
Word Art Wednesday - AG
DL Art - Thankful Thursday February Linky Challenge


Tuesday, June 2, 2015

Enjoy Today Art Journal!

I am super pumped that I finally got to try out the creamy, dreamy Dylusions Paints! If you haven't yet and are interested in them, let me tell you - you are going to love them! I gathered a bunch of supplies I was thinking of using and just decided to plunge in and see where it took me. I wanted to just play around with them, so what better place to do that than the Dylusions Art Journal!


 First I started off by painting the left page white and the right black. Then I used the two blues to sponge over a Heidi Swapp Enjoy stencil and some Distress Paints to sponge over a Tim Holtz stencil on the white page. On the left I used both blue Dylusions paints and some Cracked Pistachio to sponge over a scrolly Tim Holtz stencil. I think this was my fav colour combo - and the black behind it looks awesome! I used some Abandoned Coral and some yellow Distress Paint over the Today Heidi Swapp stencil.


This is the first page completed - I added some background stamps, Ranger Texture Paste through a Dylusions stencil, and some of the beautiful ribbon I received from Karen over at Little Scrap Pieces!  I love these Dylusions fashion stamps and I thought they'd go perfectly on these pages. I paper pieced them with some papers from my stash and glued them onto my pages. A Dylusions sentiment stamp and a Heidi Swapp shiny silver sticker finished it off!


On my second page I added some stamped images using Memento Lux Wedding Dress white ink - I absolutely love how this stamps so beautifully on the black background! To give my paper piecing shading and definition I added some Distress Markers around the edges.


Here's a look at both pages open in my journal -

Thanks so much for joining me today! I hope you're inspired to try out something new - maybe these fun paints or a stencil, or maybe just to get some fun goodies out of your stash and see where it takes you!

Linked to:
Little Scrap Pieces - show it off Saturday


Monday, April 13, 2015

FCCB #249- Welcome Spring

Welcome to another Challenge Me Monday...


Challenge #249 Welcome Spring
Make a project using whatever reminds you of Spring!

This Weeks Sponsor:


Winner will receive one Craftin Desert Diva's stamp set of their choice!
(USA address only)

To qualify for the prize, be sure to use at least 1 Cricut cut on your project and if it's not obvious, let us know what cartridge you used. If you use a Cricut Explore machine, at least one cut must be from the Cricut catalog of images.


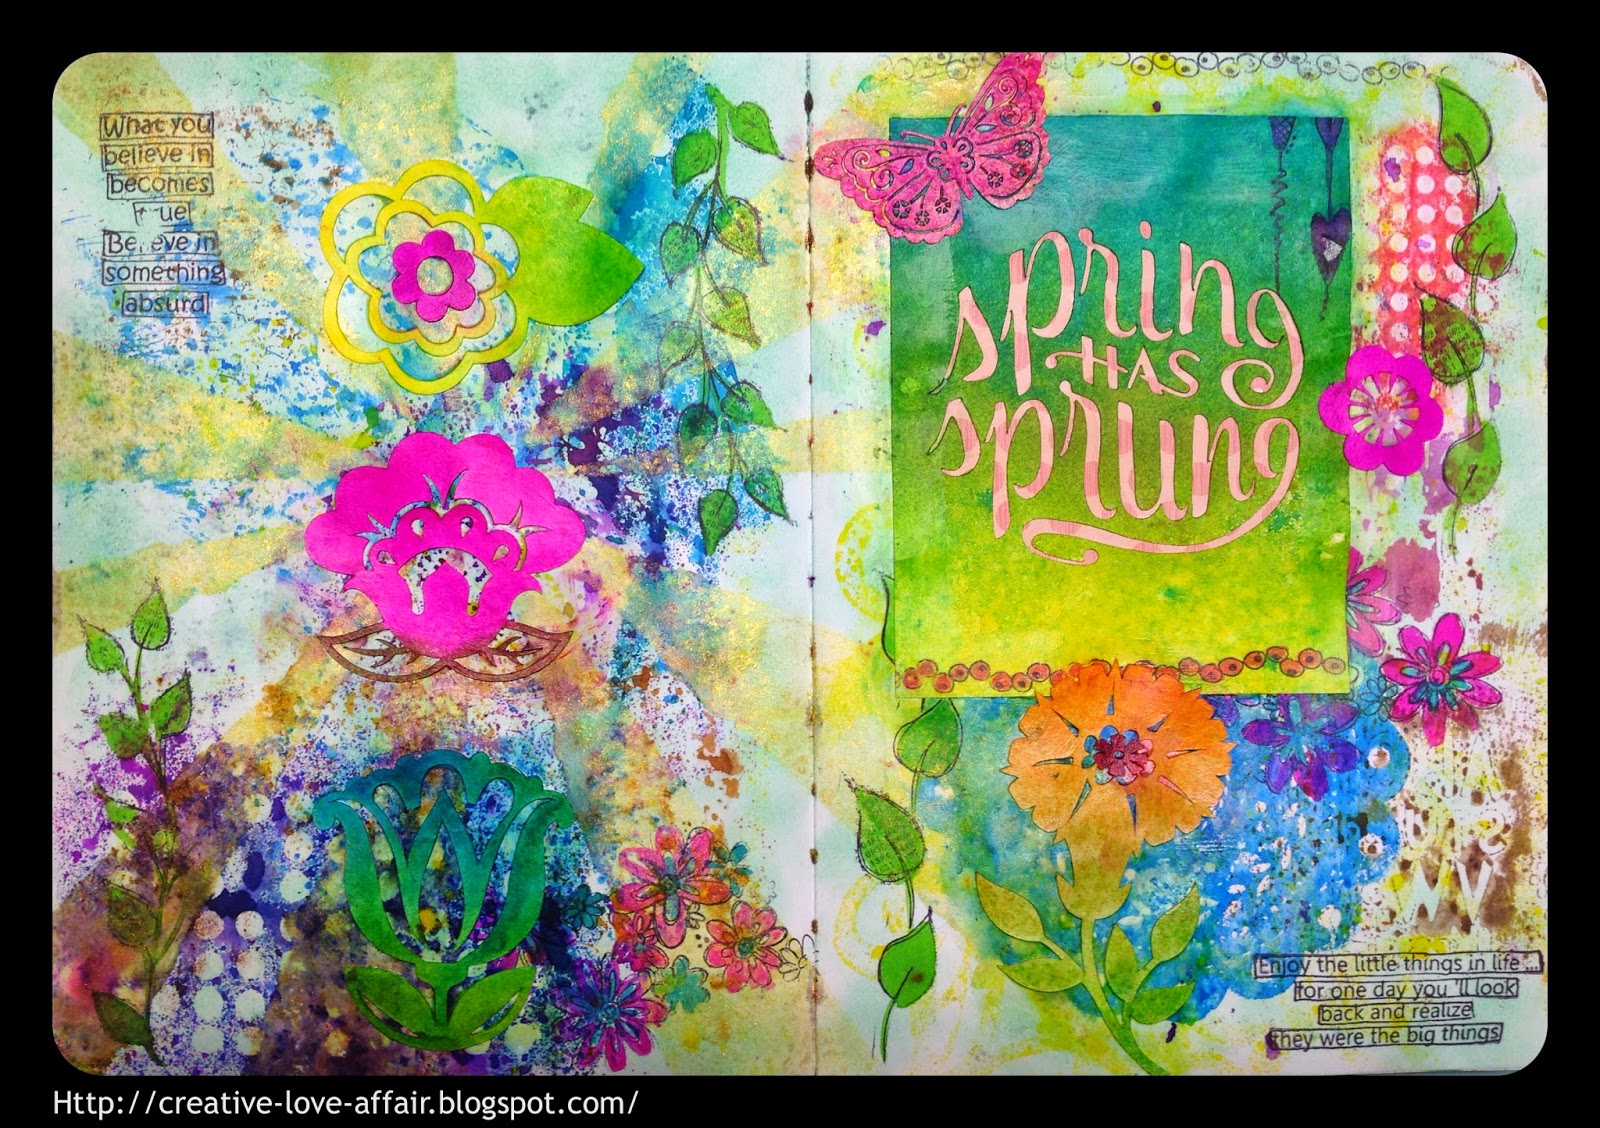
For my project this week I decided to make an art journal page. I used the Home For The Holidays Spring & Summer cartridge for the 'Spring Has Sprung' cut and the Florals Embellished cartridge for the flowers and butterfly. I cut everything from watercolour paper and then used Dylusions sprays on them to colour them in bright spring colours. I spritzed with Perfect Pearls spray mist over top of the Dylusions sprays to blend and add some shine - I love this effect!


My background pages were pages that I just had previously rubbed left over sprays on after stencilling other pages. I wasn't sure what I was going to do with these pages, and this turned out to be the perfect opportunity! I used a Heidi Swapp stencil and a shimmery gold spray over top of the background to spray the sunray stencil. I added Dylusions stamps and sentiments and then coloured them in with Dylusions sprays using a paint brush dipped directly into the spray. My diecut flowers are lined up down the middle of the first page, right in the middle of the sunray!

I used Mod Podge to layer the watercolour diecuts on my background after stamping and sponging the new Pistachio Distress Ink all over my pages.

 I hope Spring really has sprung here in Alberta, Canada! I'm ready for sure!!

Thanks so much for joining me today! Be sure to head over to the Fantabulous Cricut Blog and check out what all the other talented Design Team Members have done - and enter your own project with at least one Cricut cut! I hope you enjoy your week :)

Linked to:
Little Scrap Pieces -Show It Off Saturday
613 Avenue Create - AG (1st entry)
Create & Inspire - #18 AG (2nd entry)
Party Time Tuesdays - #197 AG (1st entry)
4 Crafty Chicks - #241 Die Cuts (2nd entry)
Jo's Scrap Shack - #83 Florals & Butterflies
Little Red Wagon - #284 Spring Is In The Air
Simon Says Stamp Monday Challenge - In the Middle (on my first page - diecut flowers)
Simon Says Stamp Wednesday Challenge - April Showers/Spring Flowers


Tuesday, October 7, 2014

Stamping, Stenciling and Snowflakes, Oh My!

Oh, I'm having so much for taking the Supplies On Hand class by May Flaum! She has such amazing ideas and a fantastic group of guest designers.  I have sooo many ideas for using my stash!

I decided to focus today on the Stamping and Stenciling lesson, and I was inspired by a snowflake layout by May to make some Christmas gift tags.  Of course, I absolutely love a mixed media look, so here we go...!


I still have my Dylusions Sprays out from the layout I created (you can check it out here) and since I wanted to go with a snowflake theme I thought they would make a perfect background. 

I started by spraying two different blues and a black mist on manilla tags and then daubing them off with a paper towel.


Next I used Pumice Stone and Chipped Saphire Distress Inks to sponge through Heidi Swapp stencils, and then I laid a Simon Says Stamp snowflake stencil down and lightly misted with the White Linen Dylusions Spray. 


I stamped a scalloped border along the bottom and a circle border along the sides, added highlights with Picket Fence Distress Marker and then white heat embossed some snowflakes and the swirl along the bottom. 


I made the sentiment by stamping on a piece of white cardstock, sponging with Tumbled Glass Distress Ink, and stencilling with Peacock Feathers Distress Ink through a star stencil. Then, I covered the whole thing with Versamark and heated it with UTEE to create s glassy effect. I popped it up with foam dots to give some dimension.  


I used some seam binding ribbon and sprayed it with 2 blues and a green Dylusions Spray. I let it dry, and it was pretty BUT then I sprayed with some water and oh my gosh! It blended so beautifully right before my eyes!


I'm not sure who will get one of these tags, but I sure had fun making them! Be sure to check back - I'll definitely be trying out more ideas from this awesome class!


Also, don't forget I'm part of a very Creepy Cricut Halloween blog hop Saturday!! (Details on the sidebar to the top left). There will be lots of fun prizes for hopping along and lots of Halloween inspiration!

Challenges -

DL Art - Thankful Thursday October Linky Party
Daisy Cottage Designs - Off The Hook Linky Party Week 22


Wednesday, December 4, 2013

Snowflake Stencilled Card

I am really enjoying the Simon Says December Card Kit! It is the first kit I have received from them and am so pleased with it.  I love that there are so many samples and videos from their amazing design team to get ideas from, and there are enough supplies to make a lot of cards!

For this card I used May Flaum's example - this cute snowflake stencil is amazing! I used Distress Ink to sponge over the stencil, around the sentiment (also included in the kit) to create a background.


 The pretty little sequins are perfect for adding to cards and I stuck them on with Glossy Accents. Simon Says Wednesday Challenge this week is to create a background without using patterned papers - so I think this qualifies :)


The next card I make was inspired by a video by Nichol Magouirk, using the supplies in this kit.  I used the pretty polkadot paper included in the kit and stamped the string, mittens, and hearts on white cardstock. As you can see we have started opening the Lego Friends' Advent Calendar...

 
I used a white gel pen to create dots on the hearts and scattered the sequins around, gluing with Glossy Accents. I popped up the stamped piece as well as the sentiment banner, both sponged with pink Distress Ink.


 You can check out the gallery at Simon Says Stamp to see more inspiration!

Happy crafting!
Karla

Thursday, April 11, 2013

Dylusions Ink and Stencils

Just got a bunch of new Dylusions spray inks and a couple stencils this week and couldn't wait to try them out!! I really only had a few other spray inks so this was my mist splurge.

For my card I layered stencils and started spritzing right onto my kraft card and my envelope. I really like how the white linen spray is opaque and shows through. I love the teal colour of the main mist and used both the inside and out of the girl stencil to highlight each area. I was going for a spring feeling with the greens and flowers since we seem to be having a really hard time getting any springtime weather to stay here in Calgary - as I'm writing this large snowflakes are falling!

I also heat embossed circular flowers on the front of the card with Crystal embossing powder and versamark so they look more like a sparkly watermark image. Inside I stamped the chandelier with Peacock Feathers Distress Ink and then embossed with the Crystal powder. I also wanted to try out a technique tat Kate showed at the Scrapbookers Paradise store on Sunday - using foil with Zig Two-Way Glue. The trick is to let the glue air dry before applying the foil. I added to paper flowers and a brad to the top flower and stamped some images, including a crown on the girl on the envelope.

Challenges -
Scrapbookers Paradise - Add embossing
http://scrapbookersparadise.blogspot.ca/2013/04/playing-in-paradise-111-embossing.html

Simon Says Stamps - April showers/spring flowers
http://simonsaysstampschallenge.blogspot.ca/2013/04/simon-says-april-showers-andor-spring.html