Tuesday, August 9, 2016

Pretty Cute Stamps August New Release Sneak Peek!

I just love being able to share with you a sneak peek of the new releases each month at Pretty Cute Stamps, and I know you are going to love this month's digital stamps as much as I do! Today, I'm giving you a sneak peek at the Birthday Monkey digital stamp set, which is so super cute!

I've created a card with this stamp by first saving a Project Life card to my computer from the iPhone app. Then I opened PicMonkey, an online editing program, and opened the PL card. After I had the base card on my screen, I choose the PNG versions of the digital stamps and layered them on. I used a light yellow colour for my stamps so that when I coloured them with my Prismacolor and Hobby Colour Markers I would get a 'no-line' effect! Some pretty sequins from 28 Lilac Lane finished off my bright birthday card!


I added some Glossy Accents over my bananas and some highlights with a white gel pen. Because I added the sentiment, included with the Birthday Monkey set, in the PNG format over a base layer I was able to change the colour before printing.

Inside, I created another card using the PL card and adding the bananas and sentiment from the stamp set. I printed it slightly smaller and layered it over some pretty papers!

And here's a FREE digital stamp set for you! You can get it until August 12th at the Pretty Cute Stamps blog. I can't wait to see what you make with it!

Thanks so much for joining me today, and be sure to come back Friday to see the big reveal of all the stamp sets available in the Pretty Cute Stamps August Digital Stamp Release! In the meantime, see all the sneak peeks today and tomorrow at the Pretty Cute Stamps blog!


Distress Marker Sticker Smooshing!

Morning Crafty Peeps! Hope you're enjoying a wonderful week so far. Today, I'm sharing a technique I've named Distress Marker Sticker Smooshing ;) I had some cute, but plain stickers in my stash and just thought they needed some oomph. Of course, what do you do when anything needs oomph? Distress It! I used some bright colours of markers and rubbed them on an acrylic stamp block, one at a time, before spritzing the block with water. Then I simply turned the block over and smooshed it onto my sticker paper, repeating as desired!


To bring it up a notch I then stamped over top with Archival Ink. Now it's ready to add to a card or put into some Happy Mail for a friend!

For these pretty round stickers I chose a few different colours of Distress Markers and some CTMH Stamps.

I love the watercolour look this technique gives - even on sticker paper!

A few more CTMH sentiment stamps and a few different marker colours work perfectly for this sheet.

I can see these working for a scrapbook page too!

Thanks so much for joining me today! I'd love to hear what you think adding a little Distress love to would make it better! Have an awesome day and be sure to check back Wednesday morning to see a Sneak Peek at this month's release from Pretty Cute Stamps!!


Thursday, August 4, 2016

Iris Folding Blast From The Past!

Emerald Creek has a challenge right now to feature a blast from the past- well, here it is! I posted this  in 2011, when blog posting was fairly new to me. It's funny to look back and think about all the changes I've gone through as a crafter since then. I actually still do love iris folding, and I still have this book - so maybe I should pull it out and try this again!

Here's a copy of the post - bad photos and all- which you can find here ;)

I recently purchased a book on Iris folding and was reminded how much I enjoy this beautiful technique.  It is so easy, but looks so complicated.  I found some Christmas cards I made last year that are still in my "Christmas Card" box since I just couldn't part with them!  It's a great way to use up long scraps of paper or tissue and you can make the card fronts while relaxing in the evening.


You can check out Emerald Creeks lovely blog, full of crafty inspiration - and link up your own blast from the past!

Smile Lawn Fawn Birthday Card!

Well, I'm just having so much fun over at Tim Holtz' Creative Chemistry 103 this week that I had to use two of his techniques from Day 1 on this card!

One of the techniques for Day 1 was Distress DIY Ombre. That inspired me to get out this Dylusions customizable ink pad that I've had in my stash for a while! It's a foam pad that you can add your own inks to. Since I don't have many Distress Reinkers like Tim used in his instructions I thought I'd use my Dylusions sprays. I masked each strip off with paper before spraying with my desired ink spray colour and created this fun and bright ink pad. This pad is fully washable, so you can change it whenever you want.

I used my new ink pad to stamp on several different types of paper with a couple different stamps. Love it!

I added a background of patterned paper from the Fancy Free collection and then layered my chevron stamped inky background, cut into 3 pieces on top. Behind my watercolour birthday background, using Year Three and Love You A Latte stamps, I added lots of fun patterned paper layers and handcut a little banner, adding the smile sentiment.
 
The second technique I used from Day 1 was Distress Off Set Stamping. I stamped these adorable Lawn Fawn stamps on watercolour paper, using Antique Linen Distress Ink and masking to create this little birthday scene. I am totally craving cake now ;) I watercoloured my images in by smooshing my Distress Inks on a craft sheet and using my waterbrush to pick up the ink. The Antique Linen ink allows you to get the 'no line colouring' effect. After colouring in I went back over my image and stamped with black Archival Ink. You can see it doesn't quite line up, which gives it that little off set watercolour look!

Inside, I used the sentiment stamp from the birthday stamp set, Year Three, and used papers from Paige Evans' Fancy Free collection again.

Thanks so much for stopping by today! I hope you're enjoying a crafty week, and some lovely weather.

Linked to:
SSS Monday Challenge - Celebrate
Lawnscaping Challenge - Patterned Palooza #135
Mojo Monday - Sketch #459


Glitter Tag by Amie!

Amie, who's 9, loved the idea of a challenge for kids over at the Simon Says Stamp Wednesday Challenge blog and got out the Stickles to make this marbleized tag to enter!


She embellished with Bakers Twine and added a homemade Frendship Pin using beads and a safety pin!

I love that she's so creative! 

Thanks for stopping by today to see what she created! You can see the card she made for her grandma in the previous post. 

Linked to -
SSS Wednesday Kids Vacation Challenge- AG with Glitter 

Wednesday, August 3, 2016

Glitter Card by Amie!

My 9 year old, Amie, has been keeping busy the last few days making some pretty crafts and when she found out that Simon Says Stamps Wednesday Challenge blog was having a kids challenge she was excited to enter it!

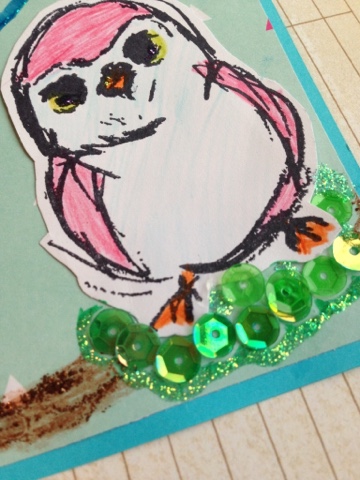
For this card she chose a Dina Wakely bird stamp and coloured it in with coloured pencils before fussy cutting it out and layering it over a patterned paper background. She made a nest from sequins from the 28 Lilac Lane collection and drew a tree branch across her page.

Amie added lots of glittery fun using Stickles glitter glue on her bird, the nest, and the tree!

A cute little sentiment from Pretty Cute Stamps Chick With Brains stamp set, a happy face😀 from the PCS Pen Pals 2 stamp set, some layered washi and some more glitter decorate the inside!

I'm sure Grandma is going to love this card!! 


Tuesday, August 2, 2016

Ombre Technique with Alcohol Inks!

I've been rewatching a lot of the videos lately from the Tim Holtz Creative Chemistry 101 and 102 classes from Online Card Classes, and I came across this neat technique using alcohol inks. I love using alcohol inks, but they're one of those things that I forget about using all the time!

I started with a piece of glossy cardstock and used the felt pads to layer on three different colours of alcohol inks from light to dark, swiping across my tag and slightly overlapping each colour to blend it all together. I took a metal heart piece from my stash and covered it with several colours of alcohol inks, including the gold mixative, with a felt pad. I filled in the heart in the centre with Glossy Accents and sprinkled glitter on in three coordinating colours.

I stamped with Archival black ink over the alcohol inked background, using several stamps at different angles. A bit of translucent embossing paste with a Tim Holtz stencil and some clear glitter on top gives it some pretty texture.

I added some blue ribbon and a cute paperclip along with some pretty yarn and ribbons at the top of my tag and then added a friendship pin. Do you remember these?! I made them when I was a kid, and just thought the other day this would be a fun thing for my girls to do. 

Erica loves making these cute little pins! All you need are safety pins and beads- which you probably have in your stash! 

A few sequins attached with Glossy Accents and my pretty tag was good to go!

Thanks so much for joining me today! I'm busy now watching Creative Chemistry 103, and will definitely be back with lots to share from that. Hope you have an awesome week!

Linked to:
SSS Wednesday Challenge - AG